Mastering Ghost Drawing: Easy Steps For Spooky & Sweet Art
Are you looking for a fun, creative outlet that’s both simple and rewarding? Perhaps you've always wanted to bring a little bit of the supernatural to life on paper, but felt intimidated by complex art techniques. Well, you're in luck! Learning how to draw a ghost isn’t scary at all, especially with our comprehensive guide focusing on making ghost drawing easy for everyone.
Whether you're a complete beginner or an experienced artist looking for a quick, charming project, this article is designed to walk you through the process step-by-step. We'll cover everything from the basic tools you'll need to creating various expressions and even adding a playful companion. Get ready to unleash your inner artist and discover just how simple and enjoyable it can be to master the art of ghost drawing!
Table of Contents
- The Allure of Ghost Drawing
- Essential Tools for Your Easy Ghost Drawing Adventure
- Getting Started: Your First Simple Sheet Ghost
- Expanding Your Ghostly Repertoire: Expressions and Styles
- Beyond the Basics: Adding a Tombstone and Scene
- Tips from Experienced Artists for Your Ghost Drawing
- Overcoming Common Drawing Hurdles & Boosting Your Creativity
- Why Easy Ghost Drawing is Perfect for All Ages
- Conclusion
The Allure of Ghost Drawing
Ghosts have captivated human imagination for centuries, appearing in folklore, literature, and art across cultures. From mischievous poltergeists to benevolent spirits, their ethereal forms offer endless possibilities for artistic interpretation. What makes a ghost drawing so appealing is its simplicity and versatility. Unlike drawing a realistic human or animal, a ghost’s form is fluid, allowing for a great deal of creative freedom. This makes it an ideal subject for those just beginning their artistic journey, or for anyone seeking a quick, satisfying sketch.
Perfect for a scary, fun Halloween drawing, or simply a charming piece of art for kids, drawing ghosts can be a delightful activity. The joy comes from seeing a simple shape transform into a character with personality, whether it's a spooky specter or a friendly phantom. As Caroline, who updated a similar guide on October 27, 2024, 1:26 pm, notes, "Ghosts are scary, but learning how to draw a ghost isn’t with this fun guide." This sentiment perfectly encapsulates the spirit of making ghost drawing easy and accessible for everyone.
Essential Tools for Your Easy Ghost Drawing Adventure
One of the best things about learning how to draw a classic sheet ghost is that you don't need an elaborate art studio or expensive supplies. You only need paper and pencil or marker to create your own ghost drawing. This minimal requirement makes it an incredibly accessible hobby. Here’s a quick rundown of what you’ll need:
- Paper: Any type of paper will do! Printer paper, sketchbook paper, or even a napkin in a pinch.
- Pencil: A standard graphite pencil (HB or 2B are good general choices) is perfect for sketching. You'll want one with an eraser.
- Eraser: A good quality eraser is crucial for correcting mistakes and refining your lines.
- Optional: Markers or Colored Pencils: If you want to add color to your ghost, a black marker for outlines, or colored pencils for shading and blush, can elevate your drawing.
That's it! With these basic items, you're fully equipped to embark on your ghost drawing journey. The simplicity of the tools reinforces just how easy it is to get started.
- Did Jep And Jessica Get Divorced The Untold Story Behind Their Relationshiphtml
- Mutstreams
- How Long Is Morgan Wallen Concert
- Jd Vance Meme
- Aishah Sofey Erome The Rising Star In The Digital Age
Getting Started: Your First Simple Sheet Ghost
Let's dive into the core of how to draw a ghost. We'll start with the most iconic representation: the classic sheet ghost. This method breaks down the process into easy, manageable steps, ensuring success for even the most hesitant artist. Remember, the goal here is to make ghost drawing easy and fun!
Step 1: The Basic Outline
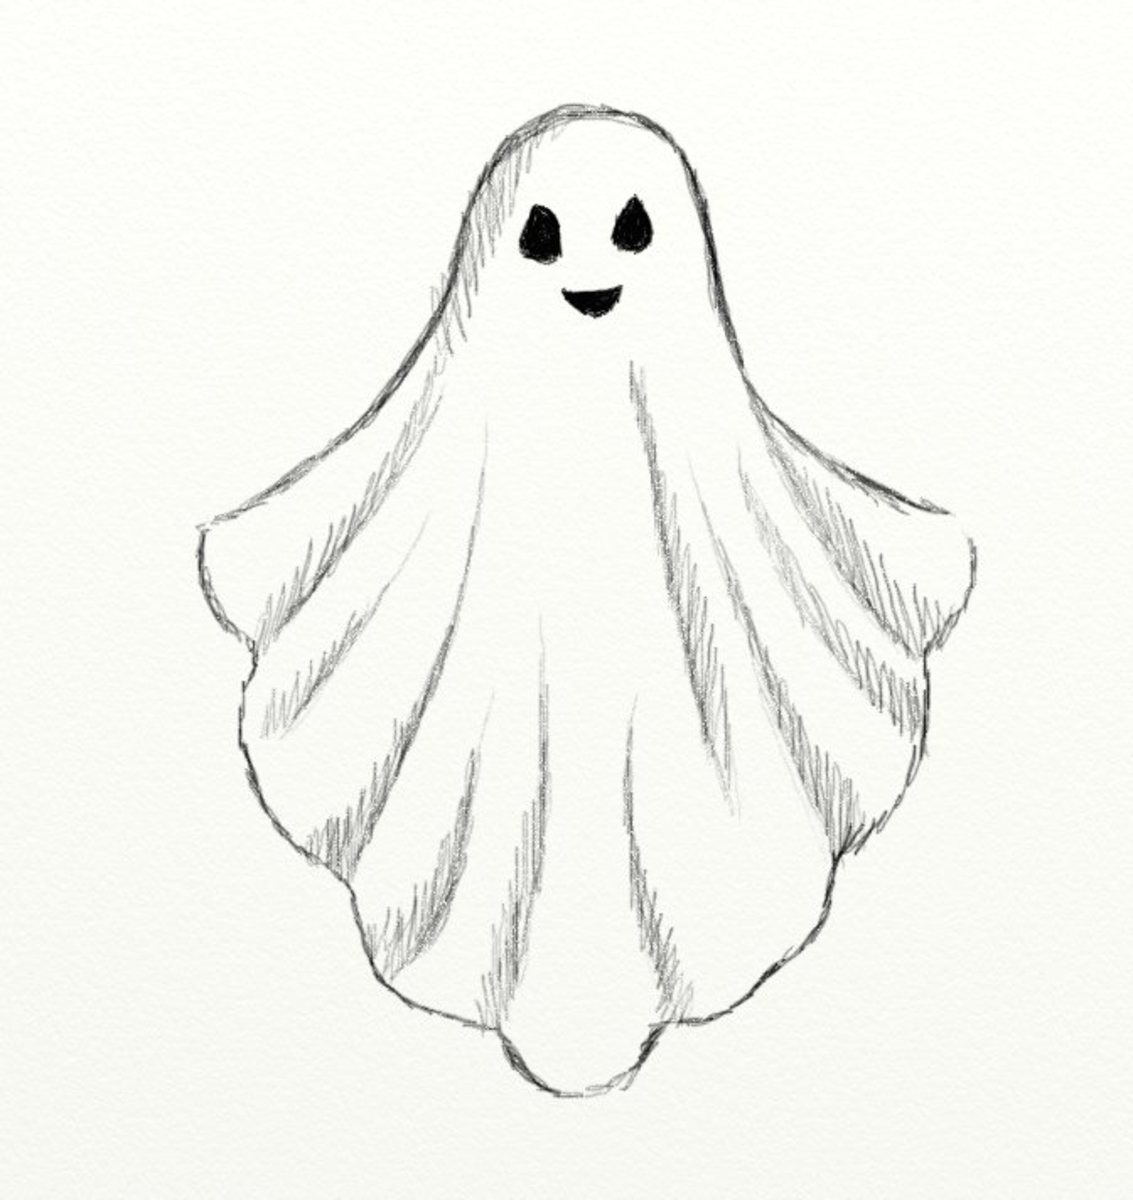
Begin by drawing the fundamental shape of your ghost. Think of it as a slightly elongated, rounded bell or a teardrop shape that's wider at the bottom. Draw the ghost with a simple rounded shape. This will be the main body of your ghost. Don't press too hard with your pencil at this stage; these are just your initial guide lines. You can always refine them later. Imagine a sheet draped over an invisible figure – it should have a soft, flowing outline, not sharp angles.
Step 2: Adding the Flow and Form
Now, let's give your ghost some character and movement. Instead of a perfectly smooth bottom edge, add some gentle, wavy lines at the base. These lines suggest the ghost is floating or drifting, giving it a more dynamic and less static appearance. You can also add subtle curves to the sides of the ghost's body to imply the folds of the sheet, making it appear more three-dimensional and less flat. Think about how a real sheet would hang and ripple.
Step 3: Crafting Expressive Eyes
The eyes are where your ghost truly comes to life, conveying its personality. For a friendly ghost, draw two simple, large ovals or circles. You can add smaller circles inside for pupils, leaving a tiny white dot for a sparkle to make them look bright and innocent. For a slightly spooky, yet still easy ghost drawing, you might draw two empty, dark ovals, or even just two small, slightly slanted lines to suggest a mysterious gaze. Follow the easy instructions and tips to create different expressions and styles of ghosts for Halloween, and the eyes are key to this.
Step 4: Final Touches and Blushing Cheeks
Once the basic form and eyes are in place, it's time for the details that make your ghost unique. Add blushing cheeks and a happy expression if you're aiming for a cute ghost. This can be done with two small, light circles or ovals on either side of the face, perhaps colored in with a light pink or red. For a happy expression, a simple curved line for a smile works wonders. You can also add a subtle outline to your ghost with a darker pencil or marker to make it stand out. Remember, these small additions can make a huge difference in the overall feel of your ghost drawing.
Expanding Your Ghostly Repertoire: Expressions and Styles
Once you've mastered the basic sheet ghost, you can easily adapt the core techniques to create a variety of ghostly characters. This is where the true fun of ghost drawing easy comes into play – endless possibilities with simple modifications.
Friendly vs. Scary Ghosts
The key to transforming your ghost from friendly to frightening (or vice versa) lies mostly in the eyes and mouth. Learn how to draw a friendly or scary ghost with easy step-by-step instructions by focusing on these features:
- Friendly Ghost: Large, round eyes, often with pupils looking slightly to the side or up. A wide, gentle smile or a soft, curved line for the mouth. Blushing cheeks add to the cuteness.
- Scary Ghost: Narrow, slanted eyes (like angry eyebrows), or empty, dark hollows. A jagged, open mouth showing teeth, or a simple, straight line for a stern expression. You can also add subtle, darker shading around the eyes or under the body to give it a more ominous feel.
Experiment with different combinations to see what kind of personality emerges!
The Adorable Ghost and Feline Friend
What could be more adorable than a ghost and its feline friend? This ghost drawing captures a sweet moment between a ghost and a playful cat, adding a narrative element to your art. It’s a fantastic way to practice drawing multiple simple figures together.
- Draw the Ghost: Start with your standard ghost drawing, perhaps making it a bit smaller if the cat will be prominent. Keep its expression happy or curious.
- Create a Small Cat: Using basic shapes, draw a small cat next to or slightly in front of your ghost. Start with an oval for the body and a circle for the head. Add two small triangles for ears.
- Add a Curled Tail: Give the cat a playful, curled tail. This adds dynamic movement and cuteness.
- Simple Facial Features: For the cat, simple dots for eyes and a tiny "W" shape for the nose and mouth are usually enough to convey its feline charm.
This combined drawing is a testament to how versatile and fun ghost drawing can be when you start to introduce other elements.
Beyond the Basics: Adding a Tombstone and Scene
To make your ghost drawing even more engaging, consider adding a simple background element like a tombstone. Follow along to learn how to draw this cute ghost and tombstone step by step, easy, to create a mini scene.
- Draw the Tombstone: A tombstone is essentially a rounded rectangle. Draw a simple rectangular shape, then round off the top corners. You can add a small base at the bottom.
- Add Details: Write "RIP" or a simple name on the tombstone. You can also add cracks or moss details for a more aged look.
- Positioning: Place your ghost floating slightly above or beside the tombstone. This creates a narrative and anchors your ghost in a setting.
- Simple Ground Line: A simple horizontal line at the bottom of your paper can serve as the ground, giving your scene a foundation.
Adding these elements transforms a single ghost into a charming vignette, perfect for a fun Halloween drawing or just a creative exercise.
Tips from Experienced Artists for Your Ghost Drawing
Even though we're focusing on making ghost drawing easy, there are always ways to improve and refine your skills. Rauno and the team of experienced artists are dedicated to helping people of all ages and skill levels learn to draw, and their insights are invaluable. Here are some tips to take your ghost drawings to the next level:
- Start Light: Always begin with very light pencil strokes. This allows you to easily erase and adjust without leaving noticeable marks on your paper. Think of these as your "ghost lines" – barely there, guiding you.
- Embrace Imperfection: Art is about expression, not always perfection. A slightly wobbly line or an asymmetrical eye can add character to your ghost.
- Practice Different Expressions: As mentioned, expressions are key. Spend time just drawing different ghost eyes and mouths on a separate piece of paper to build your repertoire.
- Use Reference: Look at images of ghosts, sheets, or even clouds for inspiration on flowing shapes and ethereal forms.
- Experiment with Shading: Even with just a pencil, you can add depth. Lightly shade one side of your ghost to suggest a light source, making it appear more three-dimensional.
- Don't Be Afraid to Erase: Erasers are your friends! They are tools for improvement, not just for mistakes. Refine your lines by erasing and redrawing.
These tips, derived from years of artistic experience, can help you not just with ghost drawing but with any drawing endeavor.
Overcoming Common Drawing Hurdles & Boosting Your Creativity
Even with simple subjects like a ghost, artists sometimes encounter small challenges. It's part of the creative process! Understanding how to approach these minor hurdles can significantly boost your confidence and the quality of your ghost drawing.
- Shaky Lines: If your lines feel wobbly, try drawing from your elbow or shoulder rather than just your wrist. This allows for smoother, longer strokes. Also, don't rush! A steady, deliberate hand works wonders. Think of it as ensuring your drawing is "connected to its local host" – meaning, your hand and paper are in sync.
- Proportion Problems: Sometimes a ghost's head might seem too big or too small for its body. Before committing to dark lines, use very faint, "ghost text" lines to map out your general proportions. This allows you to easily adjust the size and placement of elements before you define them.
- Getting Stuck on Ideas: If you're drawing a ghost and suddenly feel uninspired, take a short break. Look at other simple drawings, or just step away from your paper for a few minutes. Sometimes the "solution" is simply a fresh perspective.
- Lack of Depth: If your ghost looks flat, consider adding a subtle shadow underneath it to suggest it's floating above a surface. A light, graduated shade on one side of the ghost can also give it a rounded, more substantial appearance.
Remember, every artist faces these moments. The key is to see them as opportunities to learn and adapt, much like troubleshooting any other problem. By patiently addressing these small issues, your ghost drawing will improve dramatically.
Why Easy Ghost Drawing is Perfect for All Ages
The beauty of learning how to draw a ghost lies in its universal appeal and adaptability. It's not just art for kids; adults can find immense satisfaction in it too. Here’s why it’s a fantastic activity for everyone:
- Boosts Creativity: Simple shapes allow for boundless imaginative variations.
- Develops Fine Motor Skills: For younger artists, it's a great way to practice hand-eye coordination and pencil control.
- Reduces Stress: The act of drawing, especially something as lighthearted as a friendly ghost, can be incredibly therapeutic and relaxing.
- Builds Confidence: Achieving a recognizable and charming ghost drawing, even with just 6 easy steps, provides a sense of accomplishment.
- No Prior Experience Needed: As emphasized throughout this guide, you don't need to be an art prodigy to create a lovely ghost.
- Perfect for Themed Events: Ideal for Halloween decorations, party invitations, or just getting into the spooky spirit.
Whether you're drawing alone, with family, or teaching a group, the process of creating an easy ghost drawing is a rewarding experience that transcends age and skill barriers.
Conclusion
We hope this comprehensive guide has demystified the process of ghost drawing, proving just how easy and enjoyable it can be. From understanding the basic tools to creating expressive faces and even adding a playful cat or a tombstone, you now have all the knowledge to bring your own spectral visions to life on paper. Remember, the journey of art is about exploration and fun, not just perfection.
So, grab your pencil and paper, and don't be afraid to experiment! Your unique ghost drawing is waiting to emerge. We'd love to hear about your drawing adventures or see your creations. Feel free to share your thoughts in the comments below, or explore other drawing guides on our site for more artistic inspiration!
- Jase Robertson Kids
- Sophie Rain Only Fans Leak
- Unveiling The Life Of Emily Compagno And Her Husband
- Unveiling The World Of Teen Leaks A Deep Dive
- Aditi Mistry Nip Slip The Full Story Behind The Viral Moment

Easy Ghost Drawing - HelloArtsy
How to Draw a Ghost in 6 Easy Steps - FeltMagnet

How to Draw a Ghost in 6 Easy Steps | Ghost drawing, Easy halloween
