Mastering Faces: Your Guide To Drawing Expressive Portraits
The human face is a canvas of emotions, a unique landscape of features that tells a story without uttering a single word. For artists, the allure of capturing this complexity on paper is undeniable. Learning to draw faces is not just about replicating shapes; it's about understanding anatomy, light, shadow, and the subtle nuances that convey personality and feeling. Whether you're a budding artist or looking to refine your skills, embarking on the journey of drawing realistic faces opens up a world of creative expression and deep observation.
From the delicate curve of a lip to the intense gaze of an eye, each element contributes to the overall narrative of a portrait. This comprehensive guide will walk you through the essential techniques and considerations for drawing captivating faces, helping you transform blank paper into a mirror of human experience. We'll explore foundational principles, delve into individual features, and even touch upon how to leverage reference photos to bring your artwork to life.
Table of Contents
- Why Drawing Faces Matters: The Art of Connection
- Essential Tools for Drawing Faces: Your Artistic Arsenal
- The Foundation: Head Shape and Proportions for Faces to Draw
- Bringing Eyes to Life: The Windows to the Soul
- Crafting the Nose: Structure and Subtlety
- Expressive Lips and Mouths: Conveying Emotion
- The Importance of Ears: Often Overlooked, Never Unimportant
- Adding Depth: Hair and Neck for Complete Faces to Draw
- Capturing Emotion: Reference Photos for Faces to Draw
- Tips from an Expert: Lee Hammond's Approach to Realistic Faces
- Practice Makes Perfect: Continuous Improvement in Drawing Faces
- Conclusion
Why Drawing Faces Matters: The Art of Connection
Drawing faces is arguably one of the most challenging yet rewarding aspects of figurative art. It's more than just technical skill; it's about connecting with the subject on a deeper level. When you successfully render a face, you're not just creating an image; you're evoking an emotion, telling a story, and perhaps even capturing the essence of a person's spirit. This act of creation fosters empathy and keen observation, skills that extend far beyond the drawing board. For many artists, the ability to draw lifelike portraiture is the pinnacle of their craft, a testament to their dedication and understanding of human form and expression. It's a journey of continuous learning, where each face drawn teaches you something new about anatomy, light, and the subtle dance of human emotion.Essential Tools for Drawing Faces: Your Artistic Arsenal
Before you even begin to think about the intricacies of drawing faces, it's crucial to equip yourself with the right tools. The quality of your materials can significantly impact your drawing experience and the final outcome. For realistic portraiture, particularly with graphite pencil as referenced by artist and instructor Lee Hammond, a few key items are indispensable:- Graphite Pencils: A range of hardness (H for lighter lines and harder lead, B for darker lines and softer lead) is essential. A common set might include 2H, HB, 2B, 4B, and 6B. This variety allows for subtle tonal shifts, from the lightest highlights to the deepest shadows.
- Drawing Paper: Opt for smooth, good-quality paper that can withstand multiple layers of graphite without tearing or pilling. Bristol board or a smooth drawing paper pad are excellent choices.
- Kneaded Eraser: Unlike traditional erasers, a kneaded eraser can be molded into various shapes to lift graphite gently without smudging or damaging the paper. It's perfect for creating highlights and correcting small errors.
- Blender/Stumps/Tortillons: These paper tools are used for blending graphite, creating smooth transitions, and softening edges, which is crucial for realistic skin tones.
- Ruler: As mentioned in basic drawing tutorials, a ruler can be invaluable for establishing initial guidelines and ensuring symmetry, especially when you're just learning how to draw a simple face.
- Drawing Board/Easel: While not strictly necessary for beginners, a stable surface can greatly improve comfort and control.
The Foundation: Head Shape and Proportions for Faces to Draw
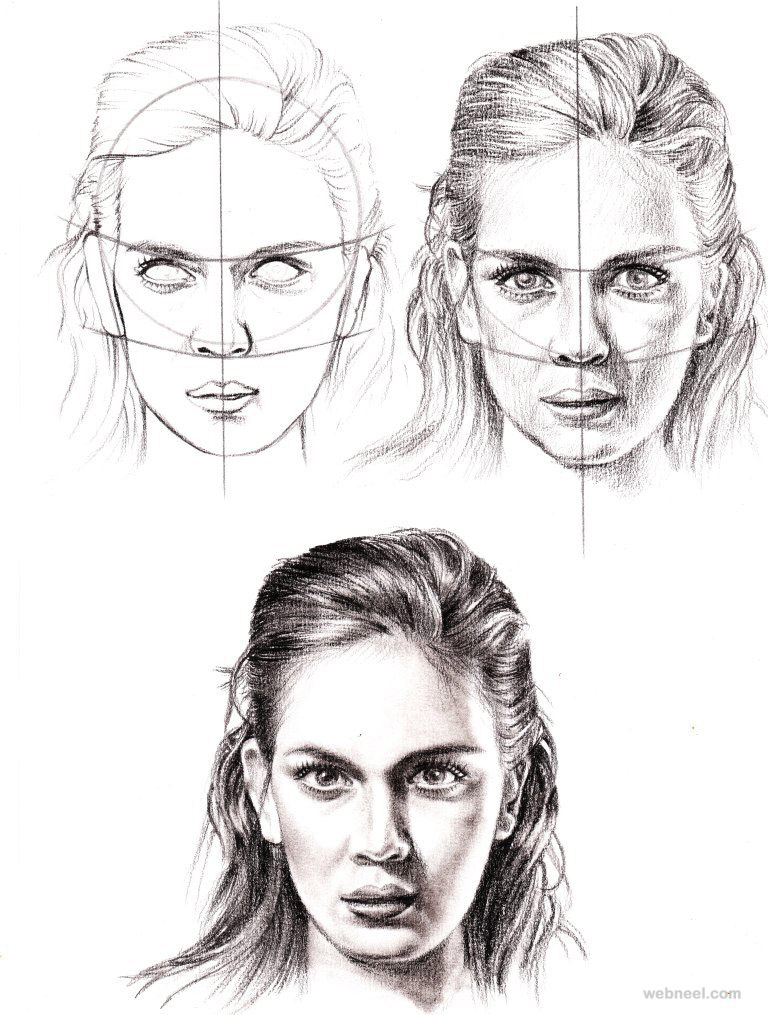
When you want to learn how to draw a simple face the easy way, the very first step is to establish the basic head shape and its fundamental proportions. This initial framework is critical because it dictates the placement of all subsequent features. Without a solid foundation, your face might appear distorted or unbalanced. Begin your drawing by deciding how much of your paper you'd like the face to take up. Using a ruler, draw a horizontal line at the top and bottom of your paper with two vertical lines around an inch from either side, creating a box to contain your drawing. This helps in managing scale and composition.The Loomis Method: A Structured Approach
One of the most widely adopted and effective methods for establishing head proportions is the Loomis Method, popularized by Andrew Loomis. This technique simplifies the complex structure of the head into basic geometric forms. You start with a sphere, which represents the cranium. Then, you flatten the sides of the sphere to create the basic form of the head. A central vertical line divides the face in half, ensuring symmetry, and a horizontal line (the brow line) helps establish the eye level. From this basic structure, you can then project the jawline and chin, tailoring it to the specific face you're drawing. This method provides a reliable blueprint, making the process of drawing faces less intimidating.Understanding Facial Ratios: The Golden Rules
Beyond the Loomis method, understanding general facial ratios is paramount for creating believable faces to draw. While every face is unique, there are common proportional guidelines that artists use:- Eyes: The eyes are typically located halfway down the head from the top of the skull to the chin. The space between the eyes is roughly the width of one eye.
- Nose: The bottom of the nose usually falls halfway between the brow line and the chin.
- Mouth: The mouth is often positioned halfway between the bottom of the nose and the chin. The corners of the mouth generally align with the pupils of the eyes.
- Ears: The top of the ears typically aligns with the brow line, and the bottom aligns with the base of the nose.
Bringing Eyes to Life: The Windows to the Soul
The eyes are arguably the most expressive feature of the face. They can convey a vast range of emotions, from joy and sadness to anger and surprise. When drawing eyes, it's crucial to think of them as spheres nestled within the eye sockets, not just flat shapes on the surface of the face. This understanding helps you render them with depth and realism. Focus on the following elements:- The Eyelids: They wrap around the eyeball. Pay attention to their thickness and how they cast subtle shadows.
- The Iris and Pupil: These are the most critical parts for conveying gaze and emotion. The pupil is a perfect circle, and the iris is a colored ring around it. Observe how light reflects in the eye, creating highlights that give it sparkle and life.
- Tear Duct: A small, often overlooked detail that adds significant realism.
- Eyebrows: They frame the eyes and are crucial for expression. Pay attention to the direction of hair growth and their overall shape.
Crafting the Nose: Structure and Subtlety
The nose is often considered one of the most challenging features to draw because it has a complex three-dimensional structure but lacks strong, defined lines. Instead of drawing the outline of the nose, focus on rendering its form through light and shadow. Think of the nose as a series of planes: the bridge, the tip, and the nostrils. Key considerations for the nose:- Bridge: The part between the eyes, varying in width and prominence.
- Tip: The most forward-projecting part, often catching the most light.
- Nostrils: These are openings, not just dark holes. Observe their shape and how they connect to the base of the nose.
- Shadows: The shadows cast by the nose are essential for defining its shape and making it appear three-dimensional. Pay attention to the shadow beneath the tip and the subtle shading along the sides.
Expressive Lips and Mouths: Conveying Emotion
The lips and mouth are incredibly versatile in conveying emotion. A slight curl, a subtle tension, or a wide smile can dramatically alter the expression of a face. When drawing lips, remember that they are soft, fleshy forms that wrap around the teeth and jaw. They are not flat lines. Tips for drawing expressive lips and mouths:- The Philtrum: The vertical groove between the base of the nose and the upper lip. This small detail adds realism.
- Upper and Lower Lip: The upper lip is often thinner and casts a slight shadow over the lower lip. The lower lip tends to be fuller.
- Corners of the Mouth: These are crucial for expression. A slight upward or downward turn can indicate happiness or sadness.
- Form and Volume: Use shading to show the curves and fullness of the lips. Avoid drawing harsh outlines.
- Teeth (if visible): When drawing teeth, avoid drawing each tooth individually with harsh lines. Instead, suggest them with subtle lines and shading, focusing on the overall shape of the dental arch.
The Importance of Ears: Often Overlooked, Never Unimportant
While often partially obscured by hair or less prominent than other features, ears are vital for completing a realistic portrait and ensuring anatomical correctness. Many beginners tend to simplify or even omit ears, but including them thoughtfully adds to the overall believability of your faces to draw. Key points for drawing ears:- Placement: As mentioned in the proportional guidelines, the top of the ear generally aligns with the brow line, and the bottom aligns with the base of the nose. This can vary slightly, but it's a good starting point.
- Anatomy: The ear has a complex cartilage structure, including the helix (outer rim), antihelix (inner ridge), tragus, and antitragus. You don't need to draw every single detail, but understanding these forms helps you suggest them convincingly with shading.
- Perspective: Ears will appear differently depending on the angle of the head. In a front view, they might be barely visible, while in a profile, they become a prominent feature.
Adding Depth: Hair and Neck for Complete Faces to Draw
Once the facial features are in place, adding hair and the neck transforms a floating head into a grounded, complete portrait. These elements frame the face and provide crucial context and depth. For hair:- Think in Masses, Not Individual Strands: Instead of drawing every single hair, focus on the overall shape, volume, and flow of the hairstyle. Use broad strokes to establish the main masses of hair.
- Direction of Growth: Pay attention to how hair grows from the scalp and falls. This adds realism and movement.
- Light and Shadow: Hair is highly reflective. Use varying tones to show highlights and shadows, giving it texture and form.
- Framing the Face: Hair can dramatically alter the perception of face shape. Use it to frame and complement the features you've drawn.
- Connect to the Head: The neck is an extension of the skull and shoulders. Ensure it connects naturally, considering the angle of the head.
- Anatomy: While you don't need to be an anatomy expert, understanding the basic forms of the sternocleidomastoid muscle (the prominent muscle running from behind the ear to the collarbone) and the trapezius (upper back muscle) can help you suggest the underlying structure.
- Shading: The neck often has subtle shadows, especially under the chin and along the sides, which help define the jawline and give the head a sense of weight and dimension.
Capturing Emotion: Reference Photos for Faces to Draw
One of the most effective ways to improve your ability to draw expressive faces is by using high-quality reference photos. Drawing from life is ideal, but photographs offer a convenient and consistent way to study different expressions, lighting conditions, and facial structures. Drawing reference photos for faces male can include everything from intense looks to soft smiles. Each expression conveys a unique emotion, adding depth to your art. For those looking for more variety, consider exploring female faces too. Drawing reference photos for faces female can provide a great contrast and broaden your understanding of facial diversity and subtle expressions.Male Faces to Draw: Conveying Strength and Subtlety
When drawing male faces, you might notice features that are often more angular, with stronger jawlines and more prominent brow ridges. However, it's crucial to avoid stereotypes and focus on the individual's unique characteristics. Male faces can convey a vast array of emotions, from rugged determination to gentle contemplation. Pay attention to the interplay of bone structure and muscle, and how subtle shifts in the eyes or mouth can communicate profound feelings. Exploring diverse male faces to draw will enhance your ability to capture individual character and expression.Female Faces to Draw: Exploring Grace and Intensity
Female faces often present a different set of challenges and opportunities. They might feature softer curves, more delicate bone structures, and a wider range of subtle expressions. The eyes, in particular, can hold immense power and convey everything from playful curiosity to deep sorrow. When drawing female faces, focus on the nuances of form and how light plays across the skin. Experiment with different hair textures and styles, as these can significantly alter the overall impression of the portrait. Broadening your understanding by practicing with diverse female faces to draw will enrich your artistic vocabulary.Tips from an Expert: Lee Hammond's Approach to Realistic Faces
If you want to draw lifelike portraiture, knowing how to draw facial features is essential. Below, artist and instructor Lee Hammond shares tips and techniques for drawing realistic faces with graphite pencil, excerpted from her book, "Lee Hammond's All New Big Book of Drawing." Hammond emphasizes a systematic approach, building up the drawing in layers from light to dark, and focusing on accurate observation. Hammond's methodology often highlights:- Starting Light: Begin with very light, almost invisible lines for your initial sketch and guidelines. This allows for easy corrections without damaging the paper.
- Building Tones Gradually: Instead of pressing hard for dark areas, build up shadows by applying multiple layers of lighter graphite. This creates smooth transitions and avoids a chalky appearance.
- Focus on Values: Hammond stresses the importance of understanding "values" – the lightness or darkness of a tone. Accurate value rendering is what gives a drawing its three-dimensionality and realism.
- Observe Negative Space: Paying attention to the shapes around the features (negative space) can help you draw the features themselves more accurately.
- The Importance of Practice: Hammond, like many seasoned artists, reinforces that consistent practice is the only true path to mastery. See more ideas about drawings, sketches, art drawings, and you'll notice the common thread of dedicated practice.
Practice Makes Perfect: Continuous Improvement in Drawing Faces
Learning how to draw simple and easy faces with these tutorials is just the beginning. The journey of mastering portraiture is an ongoing process that requires dedication and consistent practice. As the saying goes, "practice makes perfect," and this holds especially true for drawing. Each drawing session, whether it's a quick sketch or a detailed portrait, builds your muscle memory, sharpens your observation skills, and deepens your understanding of human anatomy and expression.Simple Faces to Draw: Starting Easy
Don't feel pressured to create masterpieces from day one. Begin with simple faces to draw, focusing on one feature at a time, or practicing basic head shapes. Many resources offer free worksheets (printable PDFs) that you can use to practice your drawing skills, breaking down the head shape, nose, eyes, lips, and ears into manageable steps. These tutorials often provide video courses as well, offering visual guidance that can be incredibly helpful. Starting with simpler exercises builds confidence and reinforces foundational concepts before you tackle more complex portraits.Overcoming Challenges: Persistence in Drawing
You will undoubtedly encounter challenges when drawing faces. Some days, your drawings might not turn out as you envisioned, leading to frustration. This is a normal part of the learning process. The key is persistence. Don't be afraid to make mistakes; view them as learning opportunities. Analyze what went wrong, seek feedback, and try again. Look for inspiration in others' art – see more ideas about drawing tutorial, drawing people, face drawing on platforms like Pinterest. Embrace the journey, celebrate small victories, and remember that every line you draw brings you closer to mastering the art of drawing faces.Conclusion
Drawing faces is a profound artistic endeavor that combines technical skill with empathetic observation. From establishing the foundational head shape and proportions to bringing individual features like eyes, noses, and mouths to life, each step contributes to creating a compelling portrait. By understanding the underlying anatomy, mastering light and shadow, and consistently practicing with various reference photos—whether drawing reference photos for faces male or female—you can significantly elevate your artistic abilities. Remember the wisdom of experts like Lee Hammond, who advocate for a systematic, layered approach to achieving realism. The journey to drawing lifelike faces is one of continuous learning and perseverance. So, grab your pencils, embrace the challenge, and let your creativity flow. What facial feature do you find most challenging to draw, and what strategies have you found helpful? Share your thoughts in the comments below, and explore more drawing tutorials on our site to continue your artistic growth!- Exploring Kaitlan Collins Husbands Nationality A Comprehensive Insight
- Rik Estrada Larry Wilcox
- Camilla Araujo Onlyfans Videos
- Barron Trump Height Disease
- Nna Netrebko Net Worth
How to Draw a Face - 25 Step by Step Drawings and Video Tutorials

How To Draw A Face Step By Step | Artist Hue | Portrait drawing

Face Template Drawing
