Mastering Icing: Your Guide To Perfect Homemade Frosting
Few things elevate a baked good quite like a perfectly crafted layer of icing. From the glossy drizzle on a cinnamon roll to the elegant swirls on a birthday cake, homemade icing adds that magical touch that transforms simple treats into culinary masterpieces. While store-bought options exist, there's an undeniable satisfaction and superior flavor that comes from making your own. Not only is it incredibly easy, but it also offers unparalleled control over flavor, consistency, and color, allowing you to truly customize your creations.
This comprehensive guide will walk you through everything you need to know about how to make icing from scratch. We'll explore the subtle differences between icing and frosting, delve into the essential ingredients, provide a detailed step-by-step recipe for a classic vanilla icing, and even share tips for customization, troubleshooting, and proper storage. Get ready to impress your friends and family with bakery-quality results, right from your own kitchen!
Table of Contents
- Understanding the Sweet Distinction: Icing vs. Frosting
- The Foundation: Essential Ingredients for Basic Icing
- Crafting Classic Vanilla Icing: A Step-by-Step Guide
- Beyond Vanilla: Customizing Your Icing Flavors and Colors
- Troubleshooting Common Icing Issues
- Storing Your Homemade Icing: Freshness Guaranteed
- Elevating Your Baked Goods: Creative Uses for Icing
- Why Homemade Icing is Always Best
Understanding the Sweet Distinction: Icing vs. Frosting
Before we dive into how to make icing, it's worth taking a moment to clarify a common point of confusion: the difference between "icing" and "frosting." While often used interchangeably, especially in casual conversation, there are subtle distinctions that bakers typically recognize. Learning the difference between frosting and icing, how to make them, and how to use them can significantly impact the outcome of your baked goods.
What is Icing?
Generally, icing refers to a thinner, often glossy coating that hardens slightly when set. It's typically made with confectioners' sugar (also known as powdered sugar or icing sugar) and a liquid, such as milk, water, or citrus juice, sometimes with a touch of flavoring. Its consistency ranges from a thin glaze, perfect for drizzling, to a slightly thicker coating that can be spread. A simple icing makes the sweetest finishing touch to some of my favorite baked goods, providing a delicate sweetness and a beautiful sheen. This easy recipe is perfect for cinnamon rolls, scones, muffins, cakes, and more, offering that perfect consistency for drizzling.
What is Frosting?
Frosting, on the other hand, is usually thicker, fluffier, and more opaque. It's often butter-based, incorporating butter or shortening creamed with confectioners' sugar, milk, and flavorings. Frosting is designed to be spreadable and holds its shape, making it ideal for piping intricate designs, creating tall layers on cakes, or generously topping cupcakes. Think of the rich, creamy texture of buttercream or cream cheese frosting. While we're focusing on how to make icing in this article, many of the principles, especially regarding sugar and liquid, apply to both.
The Foundation: Essential Ingredients for Basic Icing
One of the most appealing aspects of learning how to make icing is the simplicity of the ingredient list. For a basic, versatile icing, you only need three core components: confectioners' sugar, milk or cream, and vanilla extract. This lean list makes it incredibly accessible, allowing you to whip up a batch whenever the craving strikes or your baked goods need that finishing touch.
- Unveiling The World Of Teen Leaks A Deep Dive
- Camilla Araujo Onlyfans Videos
- Miu Shiromine
- Riley Green The Country Star Who Proudly Stands As A Trump Supporter
- Katseye Members
- Confectioners' Sugar (Powdered Sugar / Icing Sugar): This is the backbone of almost any icing. Its finely ground texture dissolves easily, creating a smooth, lump-free consistency. If you only have granulated sugar on hand, you’ll first need to turn it into powdered sugar. This can be done in a high-speed blender or food processor. Just be sure to process it until it's a fine powder, then run the fresh powdered sugar through a fine mesh sieve to eliminate any larger pieces of sugar. This step is crucial for achieving that silky-smooth icing texture.
- Milk or Cream: The liquid component determines the consistency of your icing. Milk is a common choice for a standard pourable or spreadable icing, while cream (like heavy cream or half-and-half) can add a richer flavor and a slightly thicker, creamier texture. The amount you use will directly impact how thick or thin your icing becomes, giving you full control over its final form.
- Vanilla Extract: While optional, vanilla extract is a classic flavoring that adds warmth and depth to your icing, complementing almost any baked good. Good quality vanilla can make a significant difference in the overall taste.
Beyond these three, you can customize the flavor, consistency, and color with different liquids, extracts, and spices, which we'll explore later. But for now, let's focus on the basics of how to make icing with these simple ingredients.
Crafting Classic Vanilla Icing: A Step-by-Step Guide
This section will walk you through the process of how to make icing, specifically a delicious and easy vanilla version. This recipe is easy to make, easy to remember, and the perfect consistency for drizzling on cinnamon rolls, cookies, scones, and more. It's incredibly versatile and will quickly become a go-to in your baking repertoire.
Preparing Your Confectioners' Sugar
The first step to achieving a lump-free, smooth icing is ensuring your confectioners' sugar is properly prepared. Even if you're using store-bought powdered sugar, it's highly recommended to sift it. Sifting helps to break up any clumps that may have formed in the bag and ensures a consistently fine powder, which is essential for a smooth finish.
To begin, add 1 cup (125 grams) of confectioners’ sugar to a medium-sized mixing bowl. If you're using a sieve, place it over the bowl and gently tap the sugar through. This simple step will save you from whisking out stubborn lumps later.
Mixing for Perfection
Once your sugar is ready, it's time to bring your icing to life. The key here is to add your liquid gradually and whisk thoroughly to achieve the desired consistency. Remember, you can always add more liquid to thin it out, but it's harder to thicken it without adding more sugar, which can change the balance of flavors.
- Add the Liquid: Then, add 2 to 3 tablespoons (30 to 45 milliliters) of milk (or cream) to the bowl with the sifted confectioners' sugar. Start with 2 tablespoons if you want a thicker icing, and add the third tablespoon if you prefer it thinner, depending on how thick you want the icing to be.
- Incorporate Flavor: Finally, pour in 1/2 teaspoon (5 milliliters) of vanilla extract.
- Whisk Until Combined: Whisk everything together until the ingredients are fully combined and smooth. Start slowly to avoid a cloud of sugar dust, then increase your speed. If you're using a hand mixer, be cautious; adding in the confectioners' sugar about a quarter cup at a time is often recommended, as a sudden influx of dry sugar can put a strain on your mixer's motor. There have been instances where a hand mixer's motor just died with about a cup left to add due to the density of the sugar.
- Adjust Consistency: If your icing is too thick, add more milk, half a teaspoon at a time, whisking well after each addition until you reach your desired consistency. For a thinner, drizzling consistency, you might need a bit more liquid. For a slightly thicker, spreadable icing, you might need a tiny bit more sugar, but always add it gradually.
You'll know your icing is perfect when it's smooth, free of lumps, and has the consistency you're aiming for. It should be easy to drizzle or spread, depending on its intended use.
Beyond Vanilla: Customizing Your Icing Flavors and Colors
One of the most exciting aspects of learning how to make icing is the endless possibilities for customization. Once you've mastered the basic vanilla recipe, you can easily adapt it to suit any flavor profile or aesthetic you desire. This allows you to truly personalize your baked goods and make them unique.
- Flavor Variations:
- Citrus Icing: Replace the milk with fresh lemon, lime, or orange juice for a zesty, bright flavor. Start with less juice and add more as needed to reach the desired consistency.
- Almond Icing: Substitute vanilla extract with almond extract for a delicate, nutty flavor. This pairs wonderfully with sugar cookies or fruit tarts.
- Maple Icing: Use maple syrup instead of some or all of the milk for a rich, autumnal flavor. This is fantastic on pumpkin bread or apple muffins.
- Coffee Icing: Dissolve instant coffee granules in a small amount of hot milk, let it cool, then use this coffee-infused milk as your liquid. Perfect for chocolate cakes or coffee-flavored treats.
- Chocolate Icing/Frosting: For a simple chocolate variation, replace ¼ to ½ cup of the powdered sugar with unsweetened cocoa powder. Sift the cocoa powder with the confectioners' sugar to ensure no lumps. Then proceed with the milk and vanilla as usual. For a richer chocolate frosting, you might also melt a small amount of butter or chocolate into the mixture.
- Spiced Icing: Add a pinch of cinnamon, nutmeg, ginger, or cardamom along with the confectioners' sugar for a warm, spiced icing. Ideal for fall and winter baked goods.
- Color Customization:
- Food Coloring: To add a splash of color to your icing, try adding a little food coloring gel. Gel colors are highly concentrated, so start with a tiny amount (a toothpick's worth) and gradually add more until you achieve your desired shade. Liquid food colorings can thin out your icing, so use them sparingly or adjust your liquid content accordingly.
- Natural Colors: For natural hues, consider using a tiny amount of beet juice for pink, turmeric for yellow, or spirulina for green. Be mindful that these can subtly alter the flavor.
The beauty of learning how to make icing is that you're in control. Experiment with different combinations to discover your favorite flavors and colors!
Troubleshooting Common Icing Issues
Even seasoned bakers encounter hiccups from time to time. When learning how to make icing, you might run into a few common issues. Don't worry, most problems are easily fixable!
- Icing is Too Thick: This is the most common issue. Simply add more liquid (milk, water, or whatever liquid you're using) a teaspoon at a time, whisking thoroughly after each addition, until you reach your desired consistency. It's always easier to thin out icing than to thicken it.
- Icing is Too Thin/Runny: If your icing is too watery, you'll need to add more confectioners' sugar. Add it gradually, a tablespoon at a time, whisking until fully incorporated and the icing thickens to your liking. Remember to sift the added sugar to prevent lumps.
- Lumpy Icing: Lumps usually occur if the confectioners' sugar wasn't sifted before mixing or if it wasn't fully incorporated. If you find lumps, continue whisking vigorously. For stubborn lumps, you can try pressing the icing through a fine-mesh sieve, though this can be messy. Prevention (sifting!) is key here.
- Grainy Icing: This can happen if the sugar isn't finely ground enough (if you made it from granulated sugar) or if it hasn't fully dissolved. Continue whisking, or if it's very grainy, you might need to warm it gently over a double boiler (if it's a glaze type) to help the sugar dissolve, then cool it before using.
- Icing Not Setting/Hardening: If your icing is meant to set (like a glaze for cookies) but remains sticky or soft, it likely has too much liquid or not enough sugar. Add more sifted confectioners' sugar gradually until it reaches a consistency that will set properly. Ensure your baked goods are completely cool before applying icing, as warmth can prevent it from setting.
Patience and small adjustments are your best friends when troubleshooting your homemade icing. Don't be afraid to tweak as you go!
Storing Your Homemade Icing: Freshness Guaranteed
While fresh icing always gives you that perfect consistency and shine that’ll make your treats look like they came from a fancy bakery, sometimes you need to make it ahead of time or have leftovers. Knowing how to properly store your homemade icing is crucial for maintaining its quality and freshness. Frosting can be made in advance and stored in an airtight container in your refrigerator for three days.
- Refrigeration: If you make this vanilla buttercream frosting ahead of time or have any leftovers, it’s easy to store for later use. For simple confectioners' sugar icing or buttercream, store frosting in a food storage container and press plastic wrap directly against the surface to prevent a crust from forming. Then, seal tightly with a lid. Store in the fridge for up to 5 days.
- Freezing: For longer storage, many types of icing and frosting, especially buttercreams, freeze beautifully. If you have freezer storage, you can make frosting three months in advance. Again, store it in an airtight container with plastic wrap pressed directly against the surface. Thaw it in the refrigerator overnight before using.
- Re-whipping After Storage: After refrigeration or thawing from the freezer, your icing might appear stiff or separated. Simply give it a good whisk or beat it with a hand mixer until it's smooth and creamy again. You might need to add a tiny splash of milk (1/2 teaspoon at a time) to restore its original consistency.
While it's convenient to store icing, for the best results, though, make what you need when you need it. Freshly made icing truly provides that optimal consistency and vibrant look that elevates your treats.
Elevating Your Baked Goods: Creative Uses for Icing
Now that you know how to make icing, it's time to put your skills to use! Icing is a delicious and versatile addition to any baked good, whether it’s a cake, cookies, or cupcakes. Its application can transform a simple treat into something extraordinary.
- Drizzling Glaze: For a thin, translucent glaze, perfect for cinnamon rolls, scones, muffins, or even a simple pound cake, make your icing on the thinner side. Drizzle it artfully over cooled baked goods using a spoon or a piping bag with a very small hole. The simple icing makes the sweetest finishing touch to some of my favorite baked goods, giving them a professional, inviting look.
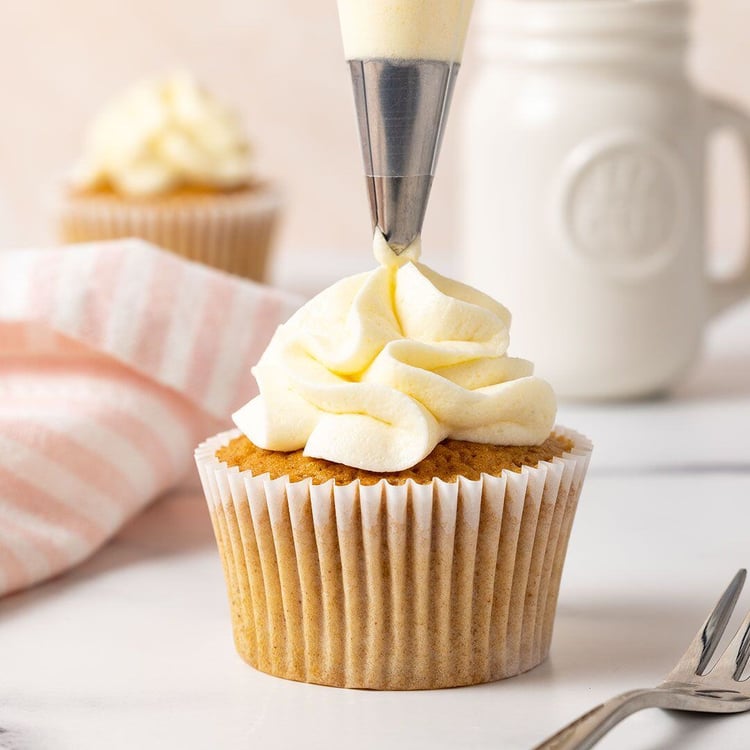
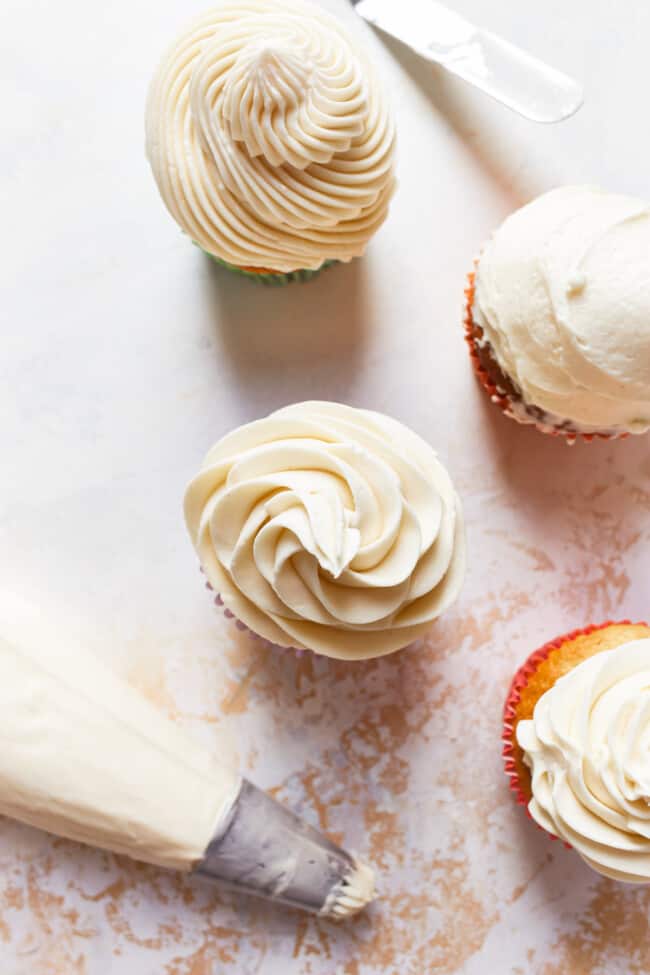
- Spreading on Cakes and Cupcakes: For a more substantial coating, like on cakes or cupcakes, adjust your icing to a thicker, spreadable consistency. If you are making cupcakes, you should be able to frost 24 cupcakes if you apply the frosting with a knife. For a birthday cake, use this simple buttercream icing recipe to decorate your birthday cakes, cupcakes, and sandwich biscuits. You can spread it smoothly with an offset spatula or use a piping bag with a decorative tip for swirls and designs.
- Cookie Decorating: Sugar cookie icing can range from a thin flood icing (for filling in outlines) to a thicker piping icing (for outlines and details). The ability to customize the flavor, consistency, and color with different liquids, extracts, and spices makes it perfect for intricate cookie art.
- Sandwich Biscuits/Cookies: A dollop of icing between two cookies creates a delightful sandwich biscuit. This works wonderfully with shortbread, ginger snaps, or chocolate cookies.
- Creative Applications: Don't limit yourself! Use icing to create edible "glue" for attaching sprinkles or candies, or pipe intricate designs directly onto parchment paper, let them harden, and then transfer them to your baked goods as edible decorations.
The possibilities are truly endless once you master the art of making homemade icing.
Why Homemade Icing is Always Best
While convenience often tempts us towards store-bought options, there are compelling reasons why making homemade icing is not only easy, but it’s also a great way to customize the flavor and texture to your liking. The benefits extend far beyond just the taste.
- Superior Flavor: Homemade icing simply tastes better. You control the quality of ingredients, opting for pure vanilla extract over artificial flavorings, or fresh milk over powdered alternatives. This results in a cleaner, richer, and more authentic flavor profile that store-bought versions struggle to match.
- Perfect Consistency: When you learn how to make icing yourself, you gain complete control over its consistency. Need a thin glaze for drizzling? A thick, pipeable frosting for decorating? You can achieve precisely what you need by adjusting the liquid and sugar ratios. Fresh icing always gives you that perfect consistency and shine that’ll make your treats look like they came from a fancy bakery.
- Customization Freedom: As explored earlier, homemade icing offers unparalleled opportunities for customization. You're not limited to standard flavors or colors. You can experiment with different extracts, spices, citrus zests, or even fruit purees to create unique and exciting combinations that perfectly complement your baked goods. Try adding a little food coloring gel for a splash of color to your butter icing, transforming a simple dessert into a vibrant masterpiece.
- No Unnecessary Additives: Store-bought icings often contain preservatives, artificial colors, and stabilizers to prolong shelf life. When you make it at home, you know exactly what goes into it, ensuring a fresher product free from unwanted chemicals.
- Cost-Effective: The basic ingredients for icing – confectioners' sugar, milk, and vanilla – are relatively inexpensive. Making your own can often be more cost-effective than purchasing pre-made tubs, especially if you bake frequently.
Ultimately, making homemade icing is a rewarding experience that elevates your baking. It’s a simple confectioners’ sugar icing that can transform any cake or baked good, adding that personal touch that truly makes your creations shine.
Learning how to make icing is a fundamental skill for any home baker, unlocking a world of delicious possibilities. From the simplest vanilla glaze to more complex flavored variations, homemade icing offers superior taste, texture, and endless customization. We've explored the differences between icing and frosting, detailed the essential ingredients, provided a step-by-step guide for a classic vanilla recipe, and offered valuable tips for customization, troubleshooting, and storage.
Now, armed with this knowledge, you're ready to transform your baked goods from good to truly exceptional. So, gather your ingredients, get whisking, and let your creativity flow! What delicious treat will you be icing first? Share your experiences and favorite icing variations in the comments below – we'd love to hear from you!
- Brigitte Sherman Age
- Camilla Araujo Onlyfans Videos
- Unveiling The World Of Teen Leaks A Deep Dive
- Debate Can Mexicans Say The Nword Context
- Alexandria Hoff
Cream Cheese Icing Recipe | Chelsea Sugar

Liz Marek on Instagram: "Did you know today is National Whipped Cream
Vanilla Frosting Recipe - The Cookie Rookie®
