Mastering Hoodie Drawing: Your Ultimate Guide To Realistic Drapes
Are you eager to enhance your artistic skills and bring your sketches to life? Learning the nuances of hoodie drawing is an excellent way to do just that. Hoodies, a ubiquitous garment in modern fashion, present a fascinating challenge for artists due to their unique fabric characteristics, drapes, and folds. This comprehensive guide will walk you through every step, from basic outlines to intricate shading, ensuring you can confidently draw any hoodie style.
Whether you're a beginner with "very little drawing experience" or an aspiring artist looking to refine your technique, understanding how to depict a hoodie accurately is a valuable skill. This article delves deep into the principles of fabric dynamics, light, and form, transforming a seemingly simple garment into a captivating subject for your artwork. Get ready to explore the exciting world of drawing this comfortable and stylish clothing choice.
Table of Contents
- The Enduring Appeal of the Hoodie: More Than Just Fabric
- Essential Tools for Your Hoodie Drawing Journey
- Laying the Foundation: The Basic Hoodie Outline
- Mastering Fabric Folds and Drapes: The Heart of Hoodie Drawing
- Adding Details: Making Your Hoodie Drawing Unique
- Shading and Lighting: Bringing Your Hoodie to Life
- Exploring Different Hoodie Styles and Variations
- Troubleshooting Common Challenges in Hoodie Drawing
The Enduring Appeal of the Hoodie: More Than Just Fabric
The hoodie, a "sweatshirt with a hood," has transcended its humble origins to become a global fashion icon. "Since ancient times, various peoples have worn hooded garments," but the modern hoodie's popularity soared, making it a "popular and comfortable clothing choice" for everyone from athletes to artists. Its widespread appeal means that mastering "hoodie drawing" is not just about sketching a piece of clothing; it's about capturing a cultural phenomenon. From "graphic designs to classic styles," hoodies come in a myriad of forms, each presenting unique artistic opportunities. Understanding the garment's structure, including features like the "muff sewn onto the lower front" and the "drawstring," is crucial for accurate representation. This section will explore the fundamental reasons why the hoodie remains a fascinating subject for artists, emphasizing its versatility and the subtle complexities it offers for drawing practice.Essential Tools for Your Hoodie Drawing Journey
Before you embark on creating your masterpiece, gathering the right tools is paramount. "First, grab a piece of paper and some crayons or markers." While this is a great start for beginners, expanding your toolkit can significantly enhance the quality and detail of your "hoodie drawing." For a more refined approach, consider:- Pencils: A range of graphite pencils (e.g., HB, 2B, 4B, 6B) for varying line weights and shading. HB is great for initial sketches, while softer leads (B-series) are perfect for darker tones and shadows.
- Erasers: A kneaded eraser for lifting graphite gently without damaging the paper, and a vinyl eraser for precise clean-ups.
- Paper: Smooth drawing paper or sketch paper is ideal. If you plan to use markers or inks, opt for thicker paper to prevent bleed-through.
- Blending Tools: Blending stumps (tortillons), cotton swabs, or even your finger can help create smooth transitions in shading.
- Reference Images: High-quality "picture reference of a hoodie" is invaluable. Look for images that clearly show folds, shadows, and different angles. You can find "hoodie drawing reference on Pinterest" or simply observe real hoodies around you.
- Light Source: If drawing from a real hoodie, ensure consistent lighting to understand how shadows fall.
Laying the Foundation: The Basic Hoodie Outline
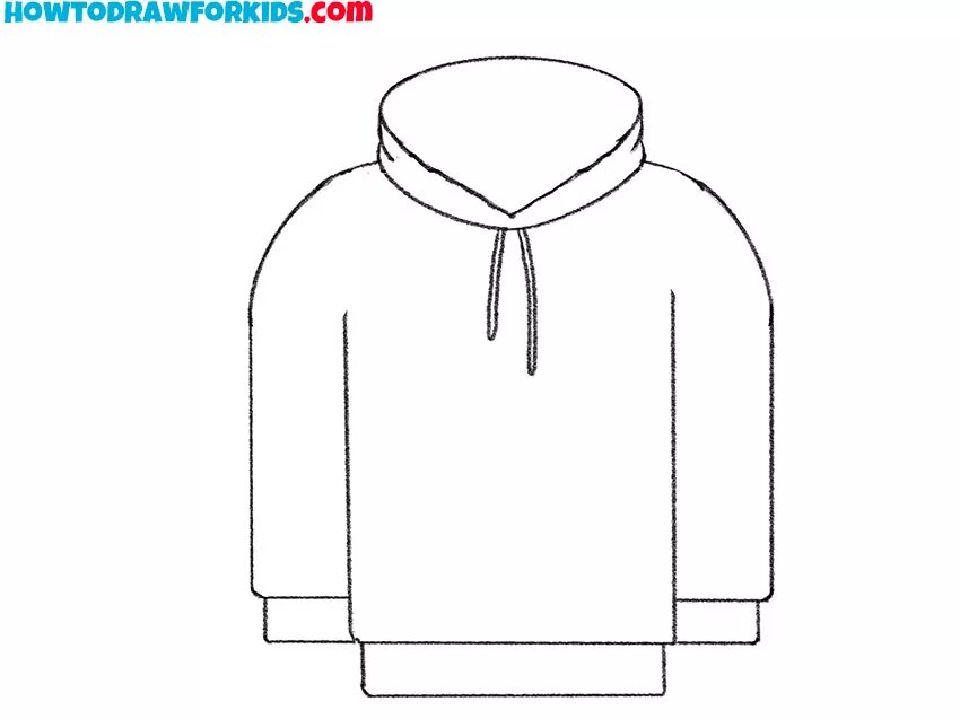
Every great "hoodie drawing" begins with a solid foundation. "To begin creating your hoodie drawing, let’s establish the basic outline." This initial stage focuses on capturing the overall shape and proportions before delving into intricate details. Remember, "this lesson will be very simple," and you can achieve a "great hoodie even if you have very little drawing experience" by following these foundational steps.Step 1: The Human Form Beneath the Fabric
Even if your drawing doesn't include a visible body, it's helpful to imagine the form underneath the hoodie. This understanding will inform how the fabric drapes and folds. "Start by sketching a simple oval shape to represent the head of the person wearing the hoodie." This "oval serves as a foundational guide for the placement of the hoodie."- Head and Shoulders: Lightly sketch a basic head shape and a simplified line for the shoulders. This gives you a reference point for how the hoodie will sit.
- Torso and Arms: Indicate the general direction and pose of the torso and arms with simple stick figures or basic geometric shapes. This helps you visualize where the fabric will stretch, compress, or hang.
- Overall Silhouette: Based on the underlying form, sketch the general outer silhouette of the hoodie. Think of it as a loose, comfortable garment that follows the body's contours without being skin-tight.
Step 2: Shaping the Hood and Collar
The hood itself is a defining feature.- The Hood: Draw the main shape of the hood, considering if it's up or down. If it's up, it will frame the head. If it's down, it will rest on the shoulders and back, creating distinct folds. Pay attention to the volume of the hood; it's not flat.
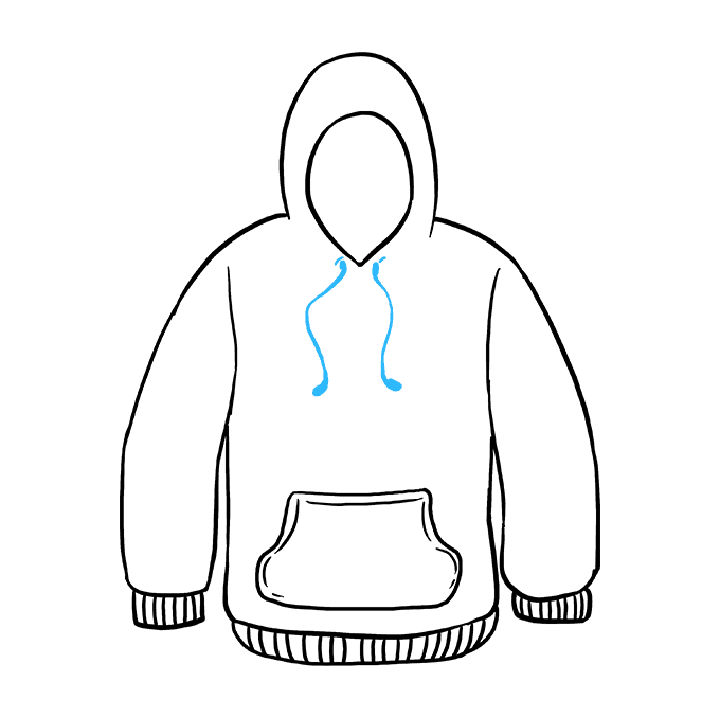
- The Collar/Neckline: For a pullover, the collar will be a simple opening. For a zip-up, consider the zipper line. The "drawstring" is often a key detail around the hood's opening.
- Sleeves and Cuffs: Sketch the general shape of the sleeves, noting how they taper towards the cuffs. Remember that sleeves will often have folds, especially around the elbows and wrists.
- Hemline: Define the bottom hem of the hoodie. This can be straight, slightly curved, or have a ribbed band.
Mastering Fabric Folds and Drapes: The Heart of Hoodie Drawing
This is where your "hoodie sketch" truly comes alive. "Making a super cool hoodie picture is all about knowing about fabric, folds, and shading." Many artists find "hoodies can be hard to draw at first," but understanding the principles of fabric dynamics simplifies the process significantly. As one art educator notes, "I try and break it down how I understand them, I hope this content helps you out on your art jo."Understanding the Physics of Fabric
Fabric isn't static; it's influenced by gravity, tension, and compression. A hoodie, typically made from fleece or cotton blends, is relatively soft and pliable, leading to specific types of folds.- Gravity: Fabric hangs and drapes downwards. This is most evident in loose areas like the bottom of the sleeves or the body of the hoodie.
- Tension: Where the fabric is pulled taut (e.g., across the chest or shoulders when arms are raised), you'll see fewer, sharper folds.
- Compression: Where fabric bunches up (e.g., at the elbows, waist, or armpits), you'll find more complex, compressed folds.
- Weight and Thickness: A thick fleece hoodie will have heavier, more rounded folds than a thin cotton one.
Common Types of Folds in Hoodies
Recognizing common fold patterns will make your "hoodie drawing" more convincing.- Pipe Folds: Long, cylindrical folds often seen in sleeves or hanging fabric, like tubes.
- Diaper Folds: Radial folds that fan out from a central point of tension, common around joints like elbows or knees, or where fabric is gathered.
- Spiral Folds: Often seen when fabric is twisted, like a sleeve that's slightly rotated.
- Zigzag Folds: Sharp, angular folds created when fabric is compressed and then released, frequently appearing around the waist or where the hoodie bunches up.
- Inert Folds: Simple, soft folds that occur when fabric is resting on a surface or hanging loosely, often seen at the bottom hem or draped over shoulders.
Adding Details: Making Your Hoodie Drawing Unique
Once the basic structure and folds are in place, it's time to add the smaller elements that truly personalize your "hoodie sketch." The provided "Data Kalimat" suggests "4 more ways to make your hoodie drawing unique" and "Make your hoodie sketch even better with these 4 fun tips." Let's expand on these:- Drawstrings and Grommets: These are iconic hoodie features. Drawstrings are usually made of braided cord and emerge from small metal or plastic grommets near the hood's opening. Show them hanging naturally, with slight bends and shadows.
- Ribbed Cuffs and Hem: Most hoodies feature ribbed bands at the cuffs and bottom hem. These have a distinct texture. Draw parallel lines or small V-shapes to indicate the ribbing, making sure they follow the curve of the garment.
- Pockets (Kangaroo or Zippered): The "muff sewn onto the lower front" (kangaroo pocket) is a common design. Pay attention to its volume and how it sags slightly. If it's a zippered pocket, draw the zipper teeth and pull tab accurately.
- Seams and Stitching: While subtle, seams add realism. Indicate them with thin, slightly darker lines. For topstitching, you can use a series of small dashes.
- Graphic Designs and Logos: Hoodies are often adorned with "graphic design" elements. Whether it's a brand logo (like "Champion, UO, Nike," or "The North Face, Carhartt") or a unique illustration, ensure the design conforms to the fabric's folds and curves. It shouldn't appear flat on a wrinkled surface.
- Zipper Details: For "zip up" hoodies, the zipper itself is a complex detail. Draw the zipper tape, the individual teeth, and the slider mechanism.
Shading and Lighting: Bringing Your Hoodie to Life
Shading is what transforms a flat outline into a three-dimensional object. It defines form, depth, and texture. "Making a super cool hoodie picture is all about knowing about fabric, folds, and shading."- Identify Your Light Source: Before you start shading, determine where the light is coming from. This dictates where highlights, mid-tones, and shadows will fall. A consistent light source is key for a believable "hoodie drawing."
- Cast Shadows: These are the darkest areas, created when an object blocks light. For a hoodie, cast shadows will appear under the hood, within deep folds, and where the garment meets the body.
- Form Shadows: These occur on the surface of the object itself, where the form turns away from the light. Think of the roundedness of a sleeve or the curve of the hood.
- Highlights: The brightest areas where light directly hits the fabric. These often appear on the edges of folds or the most prominent parts of the garment.
- Mid-tones: The areas between highlights and shadows, representing the general color of the fabric.
- Blending and Gradation: Use blending tools to create smooth transitions between tones, especially on rounded surfaces. For folds, shadows tend to be sharper at the base and gradually lighten as they move away.
- Texture: Consider the material. A thick fleece hoodie will absorb more light and have softer shadows than a shiny, thin material. Use subtle variations in your shading to suggest texture.
Exploring Different Hoodie Styles and Variations
The versatility of the hoodie means there's a vast array of styles to draw, each with its own unique characteristics. "Discover trendy men's hoodies and sweatshirts at Zumiez" or "Shop men's hoodies and sweatshirts at Urban Outfitters" to see the sheer variety. This section encourages you to broaden your "hoodie drawing" repertoire.- Pullover Hoodies: These are the most common, featuring a continuous body with a front kangaroo pocket. They tend to have simpler, looser drapes.
- Zip-Up Hoodies: Characterized by a full-length zipper down the front, these can be drawn open or closed. When open, the fabric near the zipper will have distinct folds.
- Crew Neck Sweatshirts (without a hood): While not strictly hoodies, understanding crewnecks (often found alongside hoodies in stores like "Target" or "PacSun") helps in drawing the main body of a sweatshirt.
- Graphic Hoodies: Featuring large prints or embroidered designs. The challenge here is ensuring the graphic warps convincingly with the fabric's folds. "Find graphic design... styles from brands like Champion, UO, Nike, and more."
- Oversized vs. Fitted Hoodies: An "oversized" hoodie will have more voluminous folds and drapes, while a "fitted" one will show more of the underlying body shape.
- Sporting Hoodies: Often made from performance fabrics, these might have different seam lines, ventilation details, or more structured hoods. "Shop an incredible selection of hoodies and sweatshirts at Dick's Sporting Goods" to see examples from "Nike®, The North Face®, Carhartt®."
- Hoodies with Unique Features: Some hoodies might have thumbholes, extended collars, or asymmetrical designs. These add interesting elements to your drawing.
Troubleshooting Common Challenges in Hoodie Drawing
Even with practice, you might encounter specific hurdles. Addressing these common issues can significantly improve your "hoodie drawing" outcomes.- Stiff-Looking Fabric: If your fabric looks like cardboard, you're likely not adding enough folds or your folds are too uniform. Remember that fabric is soft and responds to gravity and movement. Add more variety in fold shapes and sizes.
- Flat Shading: If your hoodie lacks depth, your shading might be too uniform. Ensure you have clear highlights, mid-tones, and deep shadows. Use a range of pencil hardnesses and practice blending.
- Inaccurate Proportions: If the hoodie looks too big or too small for the body, revisit your initial outline. Ensure the head, shoulders, and body are proportionate, and then fit the hoodie around them naturally.
- Generic Folds: Instead of just drawing random lines, consciously think about the type of fold you're depicting (pipe, zigzag, diaper, etc.) and what's causing it (tension, compression, drape). Observing real fabric is the best teacher.
- Difficulty with Drawstrings: Drawstrings can be tricky. They are cylindrical and will also have their own folds and shadows. Don't draw them as flat lines; give them volume.
- Graphics Not Conforming to Fabric: If you're adding a graphic, it must appear to wrap around the folds. Imagine the graphic printed on a piece of paper, then crumple that paper. The lines of the graphic will bend and distort accordingly.
- Lack of Volume in the Hood: The hood isn't a flat piece of cloth. It has volume and weight, especially when resting down. Draw it as a three-dimensional form, with inner and outer surfaces.
Conclusion
You've now embarked on a comprehensive journey to master the art of "hoodie drawing." From understanding the basic outline and the crucial role of fabric folds to adding intricate details and applying effective shading techniques, you have the knowledge to create compelling and realistic depictions of this iconic garment. Remember that practice is paramount; the more you draw, the more intuitive the process will become. Don't be afraid to experiment with different "colors" and styles, from "pullover" to "zip up," and to incorporate "graphic designs." The hoodie offers endless possibilities for artistic exploration. So, grab your tools, find some inspiration, and start sketching! We'd love to see your progress and hear about your experiences. Share your favorite "hoodie drawing" tips or challenges in the comments below, and don't forget to explore our other drawing tutorials to continue honing your skills. Happy drawing!- 4 Girls One Fingerprint Unraveling The Mystery Behind The Viral Trend
- Unveiling The World Of Teen Leaks A Deep Dive
- Paige Vanzant Leaked Nudes
- Johnny Rivers Wife
- Aditi Mistry Nip Slip The Full Story Behind The Viral Moment
25 Easy Hoodie Drawing Ideas - How to Draw a Hoodie

How to Draw a Hoodie - Really Easy Drawing Tutorial
25 Easy Hoodie Drawing Ideas - How to Draw a Hoodie
