Mastering Moon Drawing: Your Guide To Celestial Artistry
The allure of the night sky, particularly the enigmatic moon, has captivated humanity for millennia, inspiring poets, dreamers, and artists alike. For anyone looking to embark on a creative journey or simply find a moment of peace, learning the art of moon drawing offers a unique and rewarding experience. Whether you're a seasoned artist seeking new inspiration or a complete beginner picking up a pencil for the first time, the moon presents an accessible yet profoundly beautiful subject.
This comprehensive guide will walk you through everything you need to know about drawing the moon, from basic shapes to intricate details like craters and reflections. We'll explore techniques that make creating a realistic moon sketch achievable for everyone, proving that with simple steps and a few basic supplies, you too can easily draw a perfect moon. So, grab your favorite drawing tools, and let's embark on a stellar artistic journey together, transforming a blank page into a captivating piece of celestial art.
Table of Contents
- Why Draw the Moon? Unlocking Creativity and Calm
- Essential Tools for Your Moon Drawing Journey
- The Foundations: Starting with a Simple Moon Shape
- Adding Depth and Realism: Craters, Patterns, and Texture
- Beyond the Basics: Advanced Moon Drawing Techniques
- Integrating Your Moon Drawing into Art Projects
- The Therapeutic Power of Moon Drawing
- Final Touches and Taking Your Moon Drawing Over the Finish Line
Why Draw the Moon? Unlocking Creativity and Calm
The moon is a beautiful and mysterious celestial body that has captured the imagination of artists for centuries. Its ever-changing phases, subtle glow, and distant allure make it an endlessly fascinating subject. But why specifically choose moon drawing as your artistic endeavor? For many, it’s about more than just creating a picture; it's about finding a moment of tranquility in a busy world. I remember sitting down with just a pencil and a piece of paper, unsure of where to begin. Starting with something simple, like drawing a moon, helped me find a peaceful moment in my hectic life.
- Bonnie Bruise
- Debate Can Mexicans Say The Nword Context
- Daisys Destruction An Indepth Look At The Controversial Case
- Jackerman Mothers Warmth
- Burger King Crown Guy
As I started sketching, I felt a wave of calm wash over me. My first few attempts weren't perfect, but with each try, my drawings got better. I realized that drawing was more about the process – the meditative rhythm of pencil on paper, the gradual emergence of form, and the satisfaction of seeing something take shape under your hand. This simple act of creation can be incredibly therapeutic. If you’re a beginner pencil artist, learning how to draw the moon can be a great way to improve your skills and create stunning artwork without feeling overwhelmed. Creatives will stay engaged while learning to draw the moon in today’s drawing lesson, finding both challenge and immense satisfaction in the simplicity and depth this subject offers.
Essential Tools for Your Moon Drawing Journey
One of the most appealing aspects of moon drawing is how little you need to get started. You don't require an elaborate studio or expensive art supplies. In fact, all you need is a pencil, a piece of paper, and an eraser. These humble tools are more than sufficient to capture the moon's ethereal beauty and intricate details. For those looking to add more nuance, a set of pencils with varying lead hardness (e.g., HB, 2B, 4B, 6B) can be beneficial for achieving different shades of gray and darker tones, crucial for realistic moonscapes.
A blending stump or even a cotton swab can help you achieve smooth transitions in shading, mimicking the moon's soft glow. And don't forget a good quality eraser – not just for correcting mistakes, but also for lifting highlights and creating textures. The beauty of this minimalist approach is that it makes moon drawing accessible to everyone, regardless of their budget or prior experience. With these simple supplies and just 15 minutes, you will have your own night sky drawing! It's about skill and observation, not the cost of your tools.
- Mothers Warmth Chapter 3 Jackerman
- Katseye Members
- Sydney Sweeney Nudes
- Mother Warmth Series
- Exploring Kaitlan Collins Husbands Nationality A Comprehensive Insight
The Foundations: Starting with a Simple Moon Shape
Every great moon drawing begins with a fundamental shape: the circle. This might seem overly simplistic, but establishing a perfect circle is the first and most crucial step in drawing a full moon. You can use a compass, a circular object like a coin or a cup, or simply freehand it if you feel confident. Don't worry about perfection in this initial stage; remember, drawing is a process. Once your basic circle is laid down lightly, you've established the canvas for your celestial masterpiece.
From this basic circle, you'll begin to build volume and form. The moon is by no means some kind of smooth orb in the sky; it is marked by many features and craters. However, before delving into those details, focus on the overall lighting. Think about where the light source is coming from (the sun, of course!) and how it illuminates the moon. This will help you define the dark and light shapes that give the moon its three-dimensional appearance. Learning how to draw the moon in simple steps with a circle, dark and light shapes, and craters is a fundamental lesson that beginners will benefit from. This simple moon instruction guide is perfect for younger students looking to learn how to get into drawing, as it breaks down the process into easily manageable parts. You’ll learn the fundamentals for drawing a moon in its fullest phase, setting a strong foundation for more complex details.
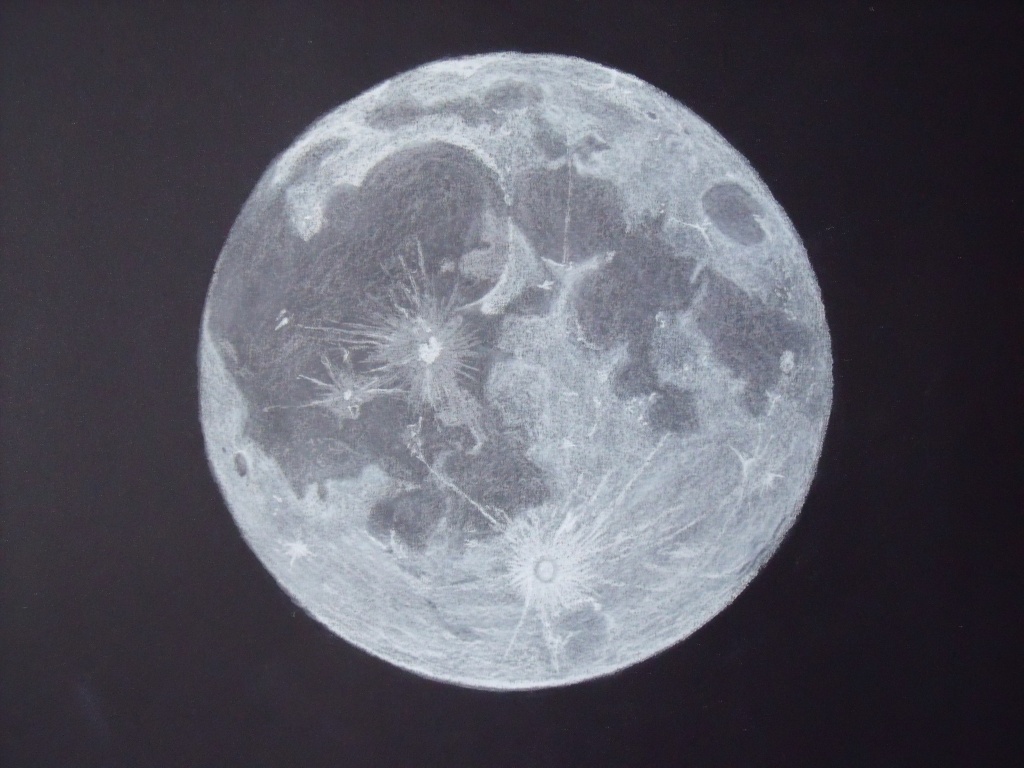
Adding Depth and Realism: Craters, Patterns, and Texture
Once you have your basic moon shape and understand the general light and shadow, the real magic of moon drawing begins: adding the intricate details that make it look realistic. The moon's surface is a tapestry of craters, maria (dark plains), and subtle variations in texture. This is where your shading techniques will truly come into play, transforming a flat circle into a spherical, pockmarked celestial body. We will start adding some of these feature details to your full moon drawing in this next step of the guide.
To achieve a realistic look, you'll use various shades of gray. Think of the moon as a grayscale photograph. Lighter grays for illuminated areas, darker grays for shadowed craters and plains. Learn how to create a realistic moon sketch with craters, patterns, and texture using simple steps and gray color. This involves layering your pencil strokes, building up the darker tones gradually, and using your eraser to lift highlights. Remember, the goal is not just to draw circles for craters but to make them appear as depressions on a spherical surface, which requires careful attention to light and shadow within each crater.
Mastering Realistic Craters
Craters are the moon's most defining feature, and drawing them effectively is key to a convincing moon drawing. To make craters look three-dimensional, consider the angle of light. A crater's rim facing the light source will be brighter, while the interior wall opposite the light will be in shadow. The floor of the crater might be partially lit or entirely dark, depending on its depth and the sun's angle. Use an HB pencil for the general outline of the craters, then switch to a 2B or 4B for the darker shadows within them. A very soft pencil (like a 6B) can be used for the deepest, darkest parts. Remember to blend the edges of your shadows to create a smooth transition, giving the impression of a gradual slope rather than a sharp line. Observing reference images of the moon is incredibly helpful here; notice how craters often overlap, creating complex patterns. This attention to detail will elevate your moon drawing from good to truly exceptional.
Textural Details for Authenticity
Beyond individual craters, the moon's surface has a general texture that adds to its authenticity. This isn't about drawing every tiny rock, but rather creating an overall impression of a rough, ancient surface. Use subtle stippling (tiny dots), scumbling (small, circular scribbles), or very light, irregular strokes to build up this texture. The maria, or lunar seas, are vast, darker plains formed by ancient volcanic eruptions. These areas should be shaded with a consistent, slightly darker gray than the brighter highlands, but still with some subtle variations to indicate their uneven surface. Avoid making the moon's surface perfectly smooth; even the "smooth" areas have a slight roughness. Your moon drawing is very nearly complete, so let’s take it over the finish line with some final details in this final step. By paying attention to these textural nuances, you'll bring your moon drawing to life, making it feel tangible and real.
Beyond the Basics: Advanced Moon Drawing Techniques
Once you've mastered the fundamentals of drawing a full moon with craters and texture, you might want to explore more dynamic and complex scenes. The moon rarely appears in isolation; it's often part of a larger night sky, interacting with other elements like stars, clouds, or even reflections on water. These advanced techniques can add narrative and atmosphere to your moon drawing, transforming it into a complete artistic composition. Watch the video tutorial by Circle Line Art School and follow the instructions with pencil and paper for more advanced methods. These additions not only enhance the visual appeal but also allow you to tell a story with your artwork, whether it's a serene moonlit night or a dramatic celestial event.
Exploring different phases of the moon, such as a crescent moon, also opens up new artistic possibilities. Each phase presents unique lighting challenges and opportunities for creative expression. Furthermore, integrating the moon into a broader landscape, like a seascape or a forest silhouette, can elevate your moon drawing to a whole new level, allowing you to experiment with composition and perspective. These steps are designed to inspire you to create beautiful, unique artwork, pushing the boundaries of your current skills.
Reflections in Water: Drawing the Moon in the Sea
A moonlit sea is one of the most enchanting scenes to capture, and learning how to draw the moon with reflection in the sea in ten easy steps can add a breathtaking dimension to your artwork. The key to a convincing reflection lies in understanding how light behaves on water. The reflection won't be a perfect mirror image; instead, it will be elongated, slightly distorted, and broken by ripples or waves. Start by drawing the moon itself, then extend soft, vertical lines downwards from the moon's brightest points onto the water's surface. Use lighter pressure for the reflection, as it will be less intense than the moon itself. For the water, use horizontal strokes and subtle wavy lines to indicate the movement of the sea. The darker areas of the water will frame the reflection, making it stand out. In our example, we drew in two small clouds underneath the moon to give it a more atmospheric look, which can also enhance the overall scene. This technique adds depth and realism, making your moon drawing truly immersive.
Capturing the Crescent and Stars
The crescent moon, with its elegant curve and accompanying stars, is another popular and beautiful subject for moon drawing. Learning how to draw a crescent moon and stars with simple supplies and 15 minutes is surprisingly straightforward. Start with a full circle as your guide, then carefully erase a portion to create the crescent shape. The key is to make the "missing" part of the moon a soft, dark shadow, often referred to as "earthshine," where the unlit portion of the moon is faintly visible due to light reflected from Earth. For the stars, use tiny dots or small crosses. Vary their size and brightness to create a sense of depth and realism in the night sky. Some stars can be brighter and more prominent, while others are mere specks. Follow the illustrated instructions and watch the video to create your own night sky drawing, ensuring a balanced and harmonious composition. This fun moon and stars drawing is an easy step-by-step drawing tutorial with simple steps, allowing you to end up with a captivating celestial scene.
Integrating Your Moon Drawing into Art Projects
A beautiful moon drawing doesn't have to exist in isolation on a single piece of paper. It can be a versatile element that enhances a wide range of art projects. Use this drawing in any moon art project, such as painting, crafts, or murals. Imagine a mural on a child's bedroom wall featuring a glowing moon and twinkling stars, or a handmade card adorned with a delicate crescent moon. You can draw the moon alone or in the sky on any of your pictures, making it a central focus or a subtle background element. The simplicity of drawing the moon means it can be easily adapted to different mediums and scales.
For example, a moon sketch can be the starting point for a watercolor painting, where you add washes of color for the sky and soft glows around the moon. In crafts, your moon drawing could be transferred onto fabric for embroidery, carved into linoleum for printmaking, or even used as a template for clay sculptures. I create a lot of drawings with moons in them, so I decided to make a blog post dedicated to moon drawing ideas because moons are such a simple thing to draw, yet it adds an element of dreaminess and aesthetic beauty to your art. Take your moon DIY to a whole new level by incorporating these drawing ideas into practical and decorative items. The possibilities are truly endless, limited only by your imagination.
The Therapeutic Power of Moon Drawing
Beyond the artistic outcome, the act of moon drawing itself offers significant therapeutic benefits. As mentioned earlier, it can be a peaceful moment in a hectic life. The focus required to observe and replicate the moon's details can be a form of mindfulness, drawing your attention away from daily stressors and into the present moment. This meditative quality makes drawing an excellent activity for stress relief and mental well-being. Beginners will benefit from this simple step-by-step lesson for learning how to draw the moon, not just for skill development but for the calm it brings.
The process of creating something, even if it's not "perfect" in your eyes, fosters a sense of accomplishment and boosts self-esteem. My first few attempts weren't perfect, but with each try, my drawings got better. This iterative process teaches patience and resilience, valuable lessons that extend beyond the drawing board. Everyone will like this simple step-by-step lesson for learning how to draw a moon because it’s not just about the final image; it’s about the journey of creation and self-discovery. It’s a low-pressure way to engage your creative side, proving that art doesn't have to be intimidating. It's about finding joy in the process and the quiet satisfaction of bringing a piece of the cosmos to life on paper.
Final Touches and Taking Your Moon Drawing Over the Finish Line
As you approach the completion of your moon drawing, it's time for those crucial final details that truly make it shine. Your moon drawing is very nearly complete, so let’s take it over the finish line with some final touches. This might involve refining the edges, deepening certain shadows, or adding subtle highlights with your eraser to make the moon appear to glow. Sometimes, a simple addition can make a huge difference. For instance, in our example, we drew in two small clouds underneath the moon to give it a more atmospheric look. These small elements can add context and enhance the overall mood of your artwork.
Step back from your drawing occasionally to assess it from a distance. This helps you spot areas that might need more shading or blending. Remember, the goal is to create an attractive moon image of your own. I will show you how to complete each moon drawing using simple shapes, lines, and shading techniques. Whether you're a skilled artist or a beginner, our collection of moon and star sketches to draw will inspire you to create beautiful, unique artwork. Don't be afraid to experiment with different techniques and make the drawing truly your own. With a few supplies and 15 minutes, you will have your own night sky drawing! And if you're looking for more inspiration, remember that there are 65,950 free images of moon drawing available online, perfect for finding an image of moon drawing to use in your next project or simply for reference. Free moon drawing photos for download are abundant, providing endless ideas. By following these simple steps, you too can easily draw a perfect moon.
The journey of moon drawing is a rewarding one, offering both artistic skill development and a calming creative outlet. From the initial circle to the intricate details of craters and reflections, each step brings you closer to capturing the moon's majestic beauty. We've explored how simple tools can yield stunning results, how to build realism through shading and texture, and how to expand your moon into broader celestial scenes. Remember, drawing is more about the process than immediate perfection. So, keep practicing, keep observing, and let the moon continue to inspire your artistic endeavors.
What aspects of moon drawing do you find most challenging or most rewarding? Share your thoughts and your own moon drawing experiences in the comments below! We'd love to see your creations and hear about your artistic journey. For more drawing tutorials and creative inspiration, be sure to explore other articles on our site.
- Exploring Kaitlan Collins Husbands Nationality A Comprehensive Insight
- Con Oneill Husband
- Christin Black
- Kiara Peach
- Camilla Araujo Onlyfans Videos

How To Draw The Moon, Step by Step, Drawing Guide, by finalprodigy
Moon Drawing at GetDrawings | Free download

Moon Drawing Tumblr
