How To Draw A Cow: Your Ultimate Guide To Creating Charming Farm Friends
Table of Contents
- Gather Your Artistic Tools: What You'll Need
- Laying the Foundation: Understanding Basic Shapes
- Method 1: Drawing a Cute Cartoon Cow from a Front View
- Method 2: Creating a Dynamic Cow with a Slight Turn
- Adding Character: Horns, Ears, and Facial Expressions
- The Iconic Cow Spots and Markings: Making Your Cow Unique
- Refining Your Cow Drawing: Erasing and Cleaning Up
- Bringing Your Cow to Life: Color and Shading Techniques
- Setting the Scene: Adding a Cool Grass Field Background
- Pro Tips for Aspiring Cow Artists
Gather Your Artistic Tools: What You'll Need
Before we dive into the exciting process of how to draw a cow, let's ensure you have all the necessary supplies. You don't need anything fancy to get started; basic tools are perfectly fine, especially for beginners. * **Pencils:** A standard graphite pencil (HB or 2B are good all-rounders) is perfect for sketching. You might want a harder pencil (like 2H) for light construction lines and a softer one (like 4B or 6B) for darker lines and shading. * **Paper:** Any drawing paper will do! Sketchbook paper, printer paper, or even a simple notepad are great for practice. * **Eraser:** A good quality eraser is essential for cleaning up guidelines and correcting mistakes. A kneaded eraser is also fantastic for lifting graphite gently without smudging. * **Optional:** Colored pencils, crayons, markers, or paints if you plan to color your cow. A blending stump or cotton swab can be useful for shading. With these simple tools, you're all set to begin your fun drawing session.Laying the Foundation: Understanding Basic Shapes
The secret to learning how to draw a cow, or any complex subject, is to break it down into simple, manageable shapes. This approach makes the entire process less intimidating and ensures your proportions are correct from the start. We’ll explore different ways to begin, whether you're aiming for a charming cartoon cow or a more realistic depiction.Cartoon Cow Basics: Simple Shapes for Cute Results
For those just starting out, or if you want to draw a cute cow with just a few pencil strokes, starting with basic geometric shapes is incredibly effective. This method is perfect for kids and those new to drawing, as it simplifies the cow's form into easily recognizable components. To draw a cartoon cow, sketch a square with curved edges attached to a large, horizontal oval. This square will form the base of the head, and the oval will be the body. These initial shapes don't have to be perfect; they are just guides. Think of them as the skeleton of your cow.Realistic Cow Proportions: Building a More Detailed Structure
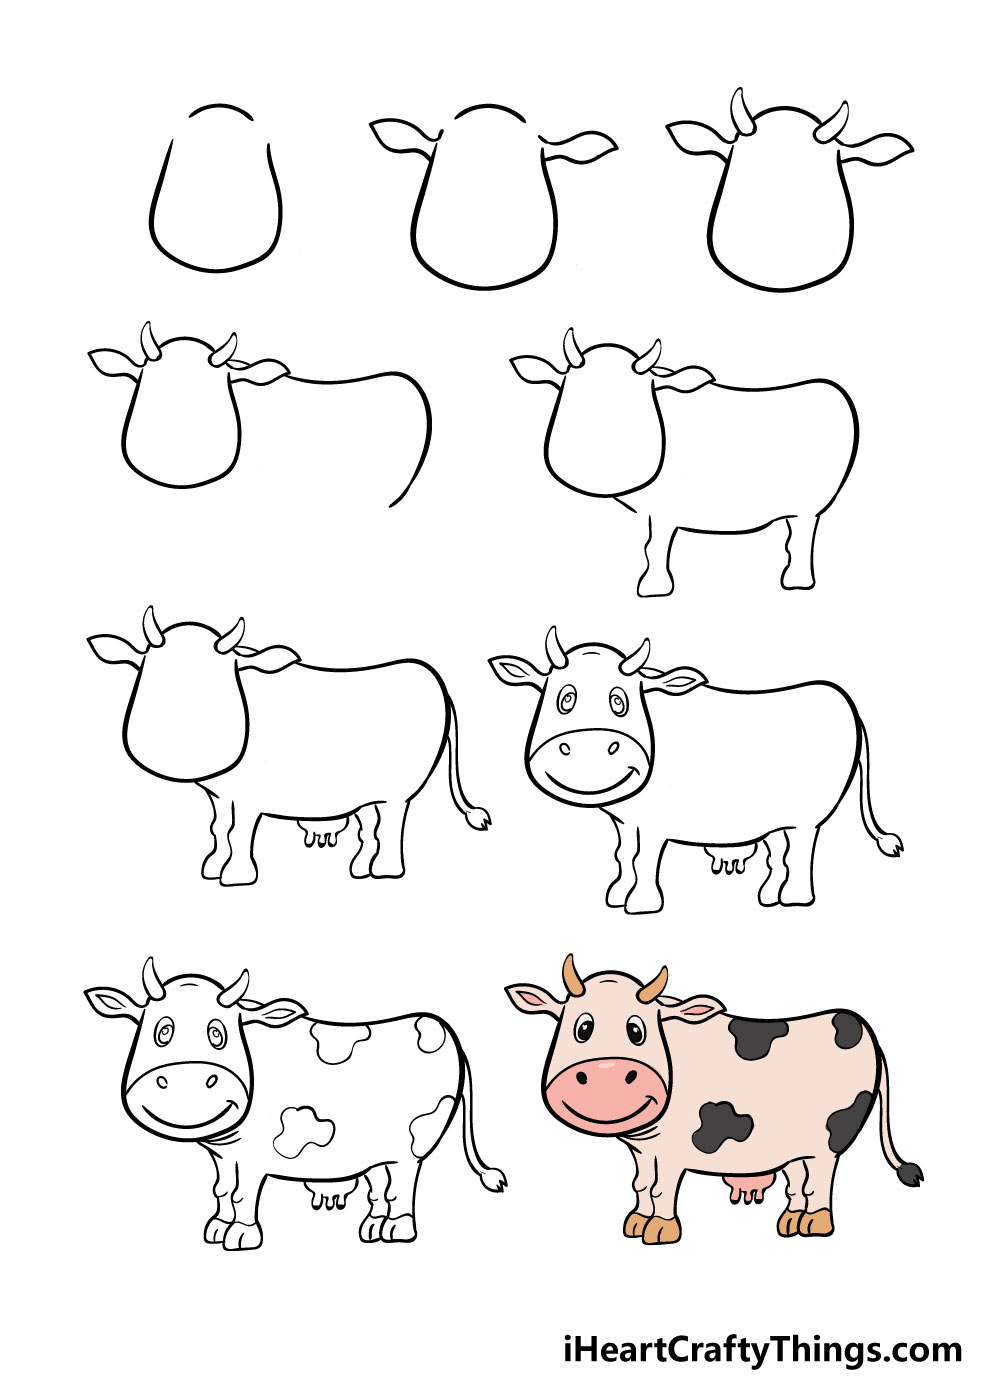
If you want to learn how to draw a realistic cow, the approach to initial shapes might differ slightly to capture more accurate proportions and angles. Unlike our usual animals, the base shape for the cow’s body is not always an oval but can often be a rectangle, especially for a sturdy, grounded look. So, draw a nice big rectangle first for the body. In the second step, we are going to continue with our construction shapes and use a diagonally angled oval shape to represent the base of the cow’s head. This slight angle immediately adds more dimension and naturalism to your drawing, preparing you for a cow with a slight turn of the head.Method 1: Drawing a Cute Cartoon Cow from a Front View
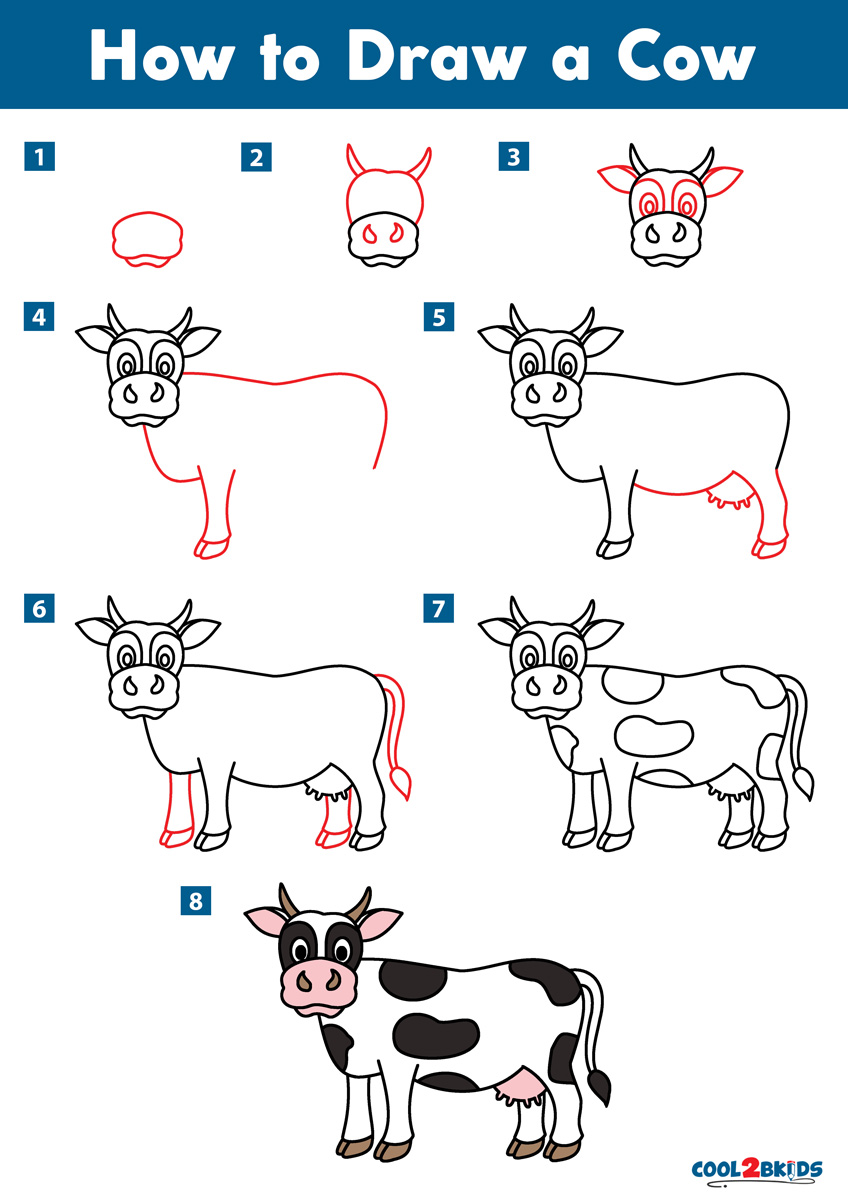
To make our drawing of a cow super easy for kids, we’ve designed our cow from a front view angle. This not only adds a cute and fun cartoon quality to the drawing but also snapshots their large incredible presence. This step-by-step tutorial will guide you through creating a charming farm friend on your paper.Step-by-Step: Head and Snout Construction
1. **Start with the Head Base:** Begin by sketching a square with curved edges. This will be the foundation of your cow's head. 2. **Add the Snout:** Inside the lower part of the square, draw a rounded rectangular snout. This gives your cow its distinctive muzzle. 3. **Eyes and Ears:** Sketch circular eyes above the snout. For the ears, draw curved shapes on each side of the square, extending slightly outwards. Finally, outline the neck and adjust the shape of the ear. Now you know how to draw a cow's head!Step-by-Step: Body and Limbs
1. **The Body:** Next, draw a huge arch to create the cow’s body. This arch should be large and horizontal, connecting to the bottom of the head shape. 2. **Base of the Limbs:** Draw circles on each side of the body for the base of the cow’s limbs. These circles will help you correctly place the legs. 3. **Drawing the Legs:** How to draw a cow's legs step 1: Draw a vertical line slightly shorter than the height of the torso. Then draw a horizontal line under it for the hoof. Sketch the curve of the front and hind limbs, making sure they look sturdy. 4. **Adding Arms (Optional Cartoon Feature):** Let’s add the cow’s arms (if you're going for a very stylized, almost human-like cartoon cow). Start with the right one. Draw a line extending down and out from the head. Fill in the end of the line with triangles to form a simple hand or hoof-like shape. Repeat for the other side.Method 2: Creating a Dynamic Cow with a Slight Turn
This how to draw a cow tutorial has a few more fun details than your average cow lesson. It will help students add things like the tuft on the forehead and appropriate size spots all over the body. The slight turn of the head, and the foreshortened legs add more dimension too, making your cow drawing look more alive and less static. 1. **Angled Head and Body:** Instead of a straight front view, begin with your initial head oval and body rectangle at a slight angle. This immediately gives the impression of movement or a pose. 2. **Foreshortened Legs:** When drawing the legs, pay attention to foreshortening. This means that the legs closer to the viewer will appear longer or more prominent, while those further away will seem shorter or partially obscured. Sketch the curve of the front and hind limbs, adjusting their length based on perspective. 3. **Distinctive Features:** As you refine the head, consider the slight turn. This will affect the placement and appearance of the eyes and ears. One ear might be more visible than the other, and the eyes might be angled slightly. 4. **Tuft on Forehead:** This small detail adds a lot of character. Draw a small, slightly messy tuft of hair on the cow's forehead, just above its eyes. All the instructions on this page show the process of drawing a cow from slightly different angles, offering you a variety of ways to approach your artwork.Adding Character: Horns, Ears, and Facial Expressions
Once the basic structure of your cow is in place, it’s time to add the details that truly bring it to life. From sketching horns to refining the ears and giving your cow a personality through its expression, these steps are crucial. 1. **Horns:** Cows typically have distinct horns. Sketch them emerging from the top sides of the head, curving outwards and slightly upwards. Their shape can vary depending on the breed, so feel free to research different cow types for inspiration. Make them sturdy and well-attached to the skull. 2. **Ears:** Refine the ear shapes. They are generally rounded with a slight fold or curve. Pay attention to how they attach to the head and their size relative to the head. You can add a bit of inner ear detail. 3. **Facial Expressions:** The eyes and mouth are key to conveying emotion. Circular eyes are common for cartoon cows, but for a more realistic look, consider the shape of the eyelids and the gentle, almost sleepy look many cows have. The snout, with its nostrils, is also a very distinctive feature. You can give your cow a peaceful, curious, or even slightly humorous expression.The Iconic Cow Spots and Markings: Making Your Cow Unique
No cow drawing is complete without its signature spots! This is where you can truly make your cow unique and add your personal touches and details. 1. **Placement and Size:** Our tutorial will help students add things like appropriate size spots all over the body. Think about how the spots wrap around the cow's form. They aren't flat shapes; they follow the contours of the body. 2. **Organic Shapes:** Cow spots are rarely perfectly round or uniform. Draw them as organic, irregular shapes with soft, curved edges. Vary their size and distribution. Some can be large, covering a significant area, while others are smaller and scattered. 3. **Pattern:** While black and white (like Holstein cows) are iconic, remember that you can also paint the cow with a different coat color and pattern. Brown and white, solid brown, or even reddish hues are common in other breeds. Feel free to experiment!Refining Your Cow Drawing: Erasing and Cleaning Up
You’re almost there! The cow is almost finished, but before you add color, it's essential to clean up your sketch. This step transforms your initial construction lines into a polished drawing. 1. **Erase Guidelines:** You take the eraser and remove all the lines that disturb the overall picture. These are the initial circles, squares, and ovals you used to build the cow's form. Be gentle to avoid smudging your final lines. 2. **Darken Final Lines:** Once the guidelines are gone, go over your desired outlines with a slightly firmer hand or a darker pencil. This makes your cow's form crisp and defined. Pay attention to areas where lines might overlap or where you want to create a sense of depth.Bringing Your Cow to Life: Color and Shading Techniques
This is where your cow truly comes alive! Adding color and shading gives your drawing depth, dimension, and personality. I’ll guide you through colors, shading, and even adding a cool grass field background. 1. **Base Colors:** In the last step, you color the cow. As mentioned, while the classic black and white is popular, you can choose any coat color. For a black and white cow, lay down a light gray for the white areas (to give them some form) and a medium gray for the black spots. For other colors, apply an even base layer. 2. **Shading for Form:** Shading is crucial for making your cow look three-dimensional. Think about where your light source is coming from. * **Highlights:** Areas directly hit by light will be the brightest. Leave these areas lighter or use a very light color. * **Mid-tones:** The general color of the cow. * **Shadows:** Areas away from the light source will be darker. Use a darker shade of your base color or a complementary color to create shadows. For instance, for a white area, a light blue or purple can create a cool shadow. For black spots, a very dark gray or even a touch of dark blue can work. * **Contour Shading:** Follow the curves of the cow's body with your shading. This emphasizes the roundness of the belly, the curve of the legs, and the contours of the head. The slight turn of the head and the foreshortened legs add more dimension too, and your shading should reflect this. 3. **Texture:** You can add subtle lines or dots to suggest the texture of the cow's fur. This doesn't need to be overly detailed; just a hint can make a big difference.Setting the Scene: Adding a Cool Grass Field Background
A simple background can significantly enhance your cow drawing, placing it in a natural habitat and adding to the overall narrative of your artwork. 1. **Horizon Line:** Start by drawing a simple horizon line behind your cow. This separates the ground from the sky. 2. **Grass Field:** For a grass field background, use varying shades of green. You can use short, quick strokes to suggest blades of grass. Make the grass closer to the cow appear slightly more detailed and larger, and as it recedes into the distance, make it less defined and lighter in color. 3. **Sky:** A simple blue sky, perhaps with a few fluffy white clouds, can complete the scene. Use light, even strokes for the sky. 4. **Subtlety:** Remember, the cow is the main subject. The background should complement it, not compete with it. Keep the background colors and details somewhat subdued so your charming farm friend remains the star of the show.Pro Tips for Aspiring Cow Artists
Drawing is a skill that improves with practice and observation. Here are a few tips to help you on your journey to master how to draw a cow: * **Observe Real Cows:** If possible, look at pictures or videos of real cows. Notice their unique body language, how their muscles flex, and the subtle variations in their coat patterns. This will greatly inform your drawing. * **Don't Be Afraid to Experiment:** Feel free to add your personal touches and details to make your cow unique. Maybe your cow has a flower behind its ear, or a mischievous wink. Creativity is key! * **Practice Different Angles:** All the instructions on this page show the process of drawing a cow from slightly different angles. Each lesson covers a different aspect or part, making the process of learning to draw a cow more comprehensive and interesting. Try drawing your cow from the side, from behind, or even looking up at it. * **Patience is Key:** Don't get discouraged if your first few attempts aren't perfect. Every stroke is a learning opportunity. The more you draw, the better you'll become. * **Have Fun!** This is a creative endeavor, so enjoy the process. We’ll have a great time learning, drawing, and creating.Your Charming Farm Friend Awaits!
Congratulations! You've navigated through the comprehensive guide on how to draw a cow, from initial sketches to adding vibrant colors and a serene background. By breaking down the process into simple, manageable steps, we hope you've discovered that anyone can create a cow of their very own by following along with these easy steps. Whether you chose a cute cartoon cow or aimed for a more realistic depiction, you now have a charming farm friend on your paper. We truly believe that this guide has made the process of learning how to draw a cow not only much easier but also incredibly fun. Your kids are gonna love it, color whatever you want! So, what are you waiting for? Scroll down and let’s make this cow happen again, perhaps with new poses or expressions. We encourage you to share your beautiful cow art with us! What was your favorite part of learning how to draw a cow? Let us know in the comments below. Don't forget to explore our other drawing tutorials to continue your artistic adventure. Thanks for watching! (And don't forget to subscribe for more amazing drawing lessons!)- Barron Trump Illness The Facts Speculations And Everything You Need To Know
- Moviesaz Fun
- Kaitlan Collins Husband A Closer Look At Their Relationship
- Emily Compagno Age
- Barron Trump Height Disease
How to Draw a Cow - Cool2bKids
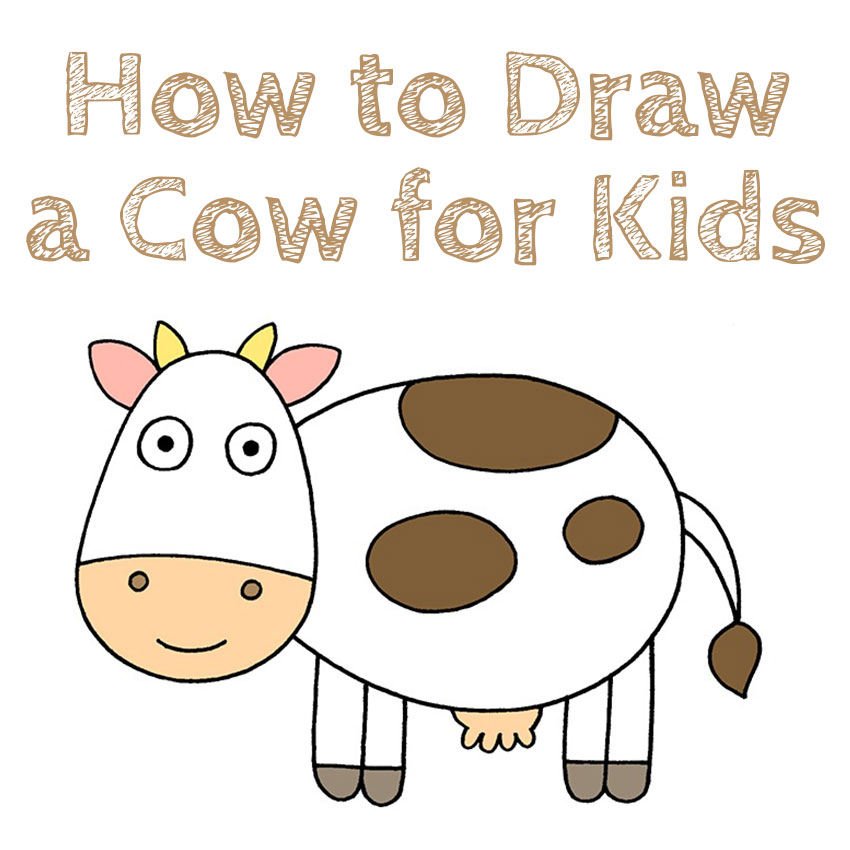
How to Draw a Cow for Kids - How to Draw Easy
Cow Drawing - How To Draw A Cow Step By Step!
